Pro Fab Timing Chain
| Pro Fab ATV
Heavy Duty Timing |
 |
The new timing chain for the 400EX from PRO FAB ATV is an extra heavy-duty timing chain. It measures to be roughly an extra 1/8-inch thicker in size when compared to the stock timing chain. 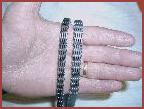 The overall length of the heavy-duty timing chain remains the same as the stock chain. Pro Fab ATV told us that it is not necessary to make any timing advancement with the heavy-duty chain. It is just a straight swap for the stock chain; no other parts need to be altered for the new timing chain installation. The beauty of the PRO FAB ATV timing chain is that the heavy-duty chain is not prone to stretching under the added increase in Hp, unlike the stock timing chain. Another nice characteristic of this heavy-duty timing chain is that it sells for .00, the stock chain sells for .00, and so for .00 difference you can have a reassured piece of mind while riding you ATV aggressively.
The installation process of the heavy-duty timing chain requires some allotted free time to do, so do not plan this installation the morning before a ride or you will be spending your riding time in the garage. First remove all plastics, gas tank, and heat shield for the gas tank. Begin by unloosening the twelve 8mm bolts on the cylinder’s headpiece. There is a cross member bolt that runs through the top of the cylinder’s headpiece, remove it using two 14mm wrenches or sockets. Use a 6mm allan key to remove the timing window and a 10mm alan key to remove the cap for turning the crank both on the left side of the case. The timing mark should be top-dead-center in the timing window, just like you were going to adjust your valves, look for the sideways T. A 17mm socket is needed to turn the crank to find top-dead-center. Now you can remove the cylinder’s headpiece and start the internal disassembling process.
 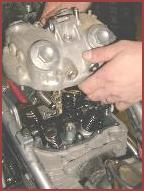 There is cotter pin on the rear brake master cylinder and a R-clip on the brake pedal itself that need to be pulled out so the pedal can be moved to make room for the next step. The bottom end side case on the clutch side will need to be taken off by extracting the thirteen 8mm bolts. Be sure that your oil is drained before performing this step to avoid a messy spill. In addition, the sending and returning oil lines will need to be disconnected from the case (you will not need to remove the short oil filter bolt toward the middle of the case). When you begin removing the internal components within the motor, be sure to organize a system that arranges your motor’s parts so they components are correctly installed in the proper fashion for reassembly. Tap the edge of the clutch side case with a rubber mallet to free it from the block. Be careful not to ruin the gasket when removing the side case. Use a 10mm socket to loosen the five clutch spring-bolts from the clutch hub assembly. (They have a color resembling brass) The clutch plates will now slide out of the basket and a 27mm socket will be needed to remove the bolt in
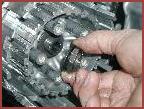 the center of the clutch basket. A second set of hands help here by keeping the ATV immobilized from rolling. Note that putting the ATV in a high gear will aid in loosening the clutch basket bolt. Next, to the right of where the clutch basket was, you will find a small sprocket for the oil pump. This sprocket will now slide right out of its position, but notice the marking KCY on the outer side of the sprocket for reinstallation purposes. You now will notice a set of sprockets forworking the
 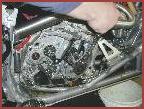 oil pump and clutch basket right between the two items. You will also see the timing chain behind them, and a 27mm bolt in front of them. While your second set of hands is there have them hold a 17mm socket on the crank bolt (opposite side) while you loosen the 27mm bolt in front of the sprockets. Look at the top end of the cylinder where you see the camshaft, timing chain, and timing chain sprocket with the two 6mm alan bolts holding the sprocket to the cam. Make sure you are still top-dead-center through the timing window and note the marks on the sprocket. This helps match up the same holes in the sprocket to the same camshaft holes for later assembly. Now
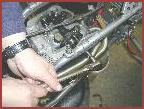 unscrew the 6mm cam/sprocket bolt and rotate the crank to the next cam/sprocket bolt and do the same procedure.
Return to the bottom end of the motor, take out the 10mm bolt holding the left timing chain guide (black), and slide out the guide. Remove the upper timing chain sprocket from the chain, and partially lowe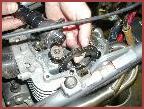 r the chain so that it creates enough slack to take it off the lower sprocket. When the old timing chain is off the lower sprocket, it will freely slide out of the top of the cylinder near the camshaft location. Lower your new heavy-duty PRO FAB ATV timing chain down to the bottom sprocket from the top of the cylinder where the old chain was just removed. Reinstall the chain on the lower sprocket first and then the upper sprocket, while making sure your timing marks are lined up the same as before. In order to install the new chain, the timing chain tensions adjuster must be loosened. The tension adjuster is located on the right rear, exterior of the cylinder. It extends off the rear of the cylinder wall and has two 8mm bolts on each end and one phillips screw in
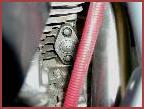 the middle. Loosen the two bolts to increase slack in the timing chain, and slide the sprocket on the camshaft. Insert the two 6mm alan bolts in the sprocket, and then tighten the two timing chain tension bolts back into place. Begin installing all the parts you removed in an order of last off, first on, using the removal process paragraphs above as your reference guide.
Although the time consumption for installing Pro Fab ATV’s heavy duty timing chain may require you to sacrifice the duration of a few afternoon or evening hours to complete. Even more difficult, getting a partner to help you with an extra set of hands (which are always welcome when doing motor work) proves to be well worth the time expense. Our past six months of grueling evaluation time spent upon our higher compression 426ex, tested everything from MX races, hare scrambles, wide open throttle drag races, and local trail system joyrides. When the heavy-duty timing chain under went examination, its status of heavy-duty deemed to be tried and true, showing no signs of wear or tear from the added horsepower and abusive riding it has been subjected to. If you were planning on equipping you 400ex with a big bore kit, we would recommend installing this heavy-duty chain from Pro Fab ATV at the same time while the motor is already apart to save some time. Otherwise any time is just as good as the present to swap in the HD chain and have a safe assured piece of mind, knowing your motor’s non visible vitals are protected from harsh treatments that may arise internally, preventing a great day of riding.