Tao tao ata 125cc D towing hitch
#1
 04-22-2014, 11:17 PM


Join Date: Apr 2014
Location: Michigan
Posts: 5
Likes: 0
Received 0 Likes
on
0 Posts
#2
04-23-2014, 09:37 AM
Right, I think I can help out a little bit.
I got a pretty similar ATV (basically the same, except scaled up to 250cc and slighty bigger dimensions).
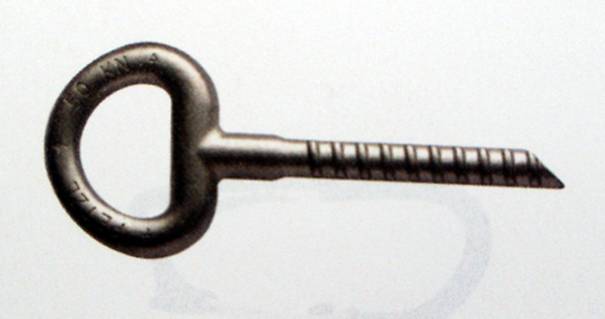
I went about it like this, I used a bolt similar to the one in the picture (I think it was originally made for tying cows or something similar). You should be able to get it in just about any hardware store.
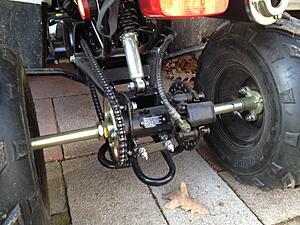
Then I drilled a hole in the bit of metal under the bottom rear shock mounting point.

Then you just get two nuts, one on each side and bolt it on, just be careful to drill in the center of the ATV, since the mounting point isn't centered(It's a bit to the right or left, depending on which side you've got your chain).
You can see how it looks in this picture.

And you can safely tow quite a bit. Later I had a custom bushing made for it too, just so the trailer pin fits a little better, but you don't need to bother with the small materials your kid is going to tow around.

I got a pretty similar ATV (basically the same, except scaled up to 250cc and slighty bigger dimensions).
I went about it like this, I used a bolt similar to the one in the picture (I think it was originally made for tying cows or something similar). You should be able to get it in just about any hardware store.
Then I drilled a hole in the bit of metal under the bottom rear shock mounting point.
Then you just get two nuts, one on each side and bolt it on, just be careful to drill in the center of the ATV, since the mounting point isn't centered(It's a bit to the right or left, depending on which side you've got your chain).
You can see how it looks in this picture.
And you can safely tow quite a bit. Later I had a custom bushing made for it too, just so the trailer pin fits a little better, but you don't need to bother with the small materials your kid is going to tow around.
#3
04-23-2014, 07:51 PM
Join Date: Apr 2014
Location: Michigan
Posts: 5
Likes: 0
Received 0 Likes
on
0 Posts
Exactly what I wanted to know ... Thank you !!
A few more questions:
I have tried to zoom in on your picture to see where exactly the hole is you drilled under the bottom rear mount shock pint ... I can't see it ?
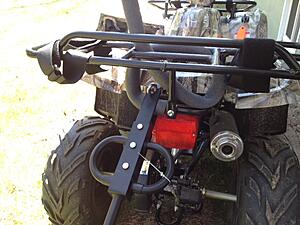
I do see what looks like 5 silver bolts on top of the chain guard .... 2 bolts on the left, 2 on th right and one in the top between the the top left and top right bolts.
Here a picture if what mean when i say " the chaun guard "
Thank you so much for the pictures ! I would love a more close up picture to help me understand where to drill and the a pic how the cow bolt comes into play .
A few more questions:
I have tried to zoom in on your picture to see where exactly the hole is you drilled under the bottom rear mount shock pint ... I can't see it ?
I do see what looks like 5 silver bolts on top of the chain guard .... 2 bolts on the left, 2 on th right and one in the top between the the top left and top right bolts.
Here a picture if what mean when i say " the chaun guard "
Thank you so much for the pictures ! I would love a more close up picture to help me understand where to drill and the a pic how the cow bolt comes into play .
#4
04-24-2014, 09:54 AM

Right, I managed to find the proper term and the picture for the "cow thing".
It's called an eye bolt.
I marked down the area where you should be drilling and the approx. location of the hole, obviously you should be doing your own measurements to get it centered. The picture is pretty bad quality but you should see the general location of things from it.
What you're looking for is a sligthly bigger bit of metal that's above the Axle and has the shock absorber mounted on it on top.
Also the bolts you mentioned are used for tightening the chain, so you'd typically want to -not- mount anything on them.
After you've got your properly sized hole, your eye bolt and two nuts you're just going to be sliding in the bolt with one nut on each side to make it nice and tight. And then the loop on the end of the bolt should be used to attach your cart/trailer.
Also here's a video of the cart I've got, just because (The video does show how the trailer gets connected).

#5
04-25-2014, 06:35 AM
Join Date: Apr 2014
Location: Michigan
Posts: 5
Likes: 0
Received 0 Likes
on
0 Posts
Thank you again. That red dot helps. My son's atv chain is on the left side so I will be sure to focus on centering the hole. The quad is at my cottage so I will report back here is a few weeks hopefully with pictures 
Thank you for the pictures ! And guidance . I am taking it back to the place I bought it this Saturday to have them to the first oil change and checkup as I have only had the quad for a few weeks. I might ask their mechanic to drill the hole for me
Thank you for the pictures ! And guidance . I am taking it back to the place I bought it this Saturday to have them to the first oil change and checkup as I have only had the quad for a few weeks. I might ask their mechanic to drill the hole for me

#7
04-27-2014, 09:56 PM
Join Date: Apr 2014
Location: Michigan
Posts: 5
Likes: 0
Received 0 Likes
on
0 Posts
i did not drill a hole. my 125D did not have room (where you drilled yours)
my 125D
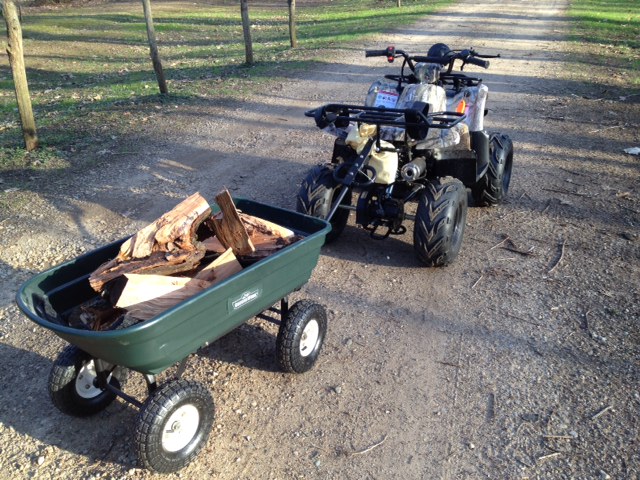
GOOD NEWS though ... i came up with another way to tow. i got this cart at tractory supply company
GroundWork® Garden Dump Cart, 600 lb. Capacity - Tractor Supply Co.
and hooked it to the frame, under the seat, using trailer pin. i put some foam pipe padding on the frame so as not to scrap the frame.
works great! (yellow towel used for padding before i purchased the pipe foam padding.)

thank you sooooo much for your picture and sharing how to modifidied your quad !
my 125D

GOOD NEWS though ... i came up with another way to tow. i got this cart at tractory supply company
GroundWork® Garden Dump Cart, 600 lb. Capacity - Tractor Supply Co.
and hooked it to the frame, under the seat, using trailer pin. i put some foam pipe padding on the frame so as not to scrap the frame.

works great! (yellow towel used for padding before i purchased the pipe foam padding.)
thank you sooooo much for your picture and sharing how to modifidied your quad !
Trending Topics
#8
11-01-2014, 12:07 PM

Weekend Warrior
Join Date: Mar 2011
Location: Southern MD
Posts: 14
Likes: 0
Received 0 Likes
on
0 Posts
#9
11-02-2014, 05:32 AM
Join Date: Apr 2014
Location: Michigan
Posts: 5
Likes: 0
Received 0 Likes
on
0 Posts

Thread
Thread Starter
Forum
Replies
Last Post
Jeff Roper
Polaris Ask an Expert! In fond memory of Old Polaris Tech.
1
02-01-2022 11:48 AM
Cdenton
Technical and How-To Articles
1
09-09-2015 11:23 AM
Currently Active Users Viewing This Thread: 1 (0 members and 1 guests)