ATV Clutch Performance
March 26, 2009
By Jason Giacchino
 When it comes to the manual clutch of a modern sport ATV, all of the power in the world is only as good as what makes it to the ground certainly applies. Engine modifications, frame geometry changes, and lighter components all amount to nothing if a worn out clutch is quietly robbing the motor of power. In this article we plan to shed some light on the various components that comprise a manual clutch so as to lessen the stress associated with visually inspecting them for signs of wear. We’ll also dive into the intricacies of the oil that provides vital lubrication to this area.
 The core of any clutch is the tolerance within the friction plates. It’s these fiber and metal rings that take a majority of the abuse in sloppy shifting and the wear and tear associated with normal use. Perhaps intimidating to the untrained eye, the reality of the situation is that the stack of plates within the clutch basket is usually quite easy to access and just as easy to assess by simply looking carefully.
Vintage quads, kids ATVs & minis, and base-level models will likely make use of non-adjustable shocks. They are easily identified by a lack of external controls/ reservoir. They typically operate with a single gas-filled chamber and an outer coil-over spring to provide motion damping. Unfortunately these units not only offer no specific setup options, they are typically non-rebuildable.
 TIP: Tilting the ATV onto its side generally makes for much easier access to the clutch components than kneeling or crouching to become parallel with the clutch cover.
To access the inner-components, begin by disconnecting the cable and removing the clutch cover. Keep in mind that often times the bolts of the cover come in various lengths so it’s a good practice to place the proper bolts into the cover while working to make reassembly much less challenging.
Directly beneath the cover will be a series of (usually six) retaining bolts and the clutch springs. These too should be removed.
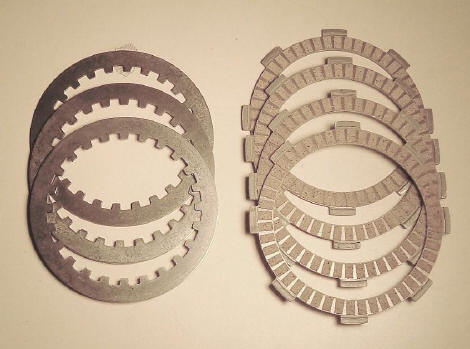
Once the springs and pressure plate are off, the fiber clutch plates should finally be into view. Inspect these plates carefully for uneven wear. A strong clutch should have ample fiber material present on the plates (or at the very least, some visible meat on the friction squares that line the fiber pads). Normal color should be shades of brown to beige. If the plates are black, singed, burnt or damaged, replacement is your only option.
Now you’ll likely notice that nestled between each fiber clutch plate is a metal (steel) plate. These plates are actually even easier to diagnose thanks to factory-installed dimples designed to indicate wear. If these patterned dimples are flattening out (becoming smooth) or there is visible warping of the plate itself, toss them aside as well.
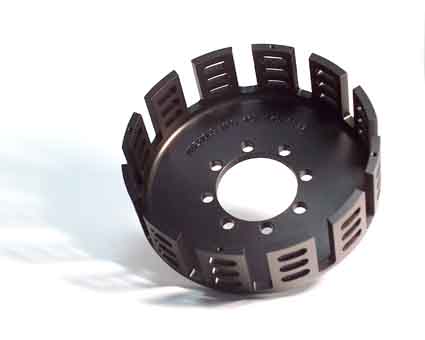 Once you’ve assessed the condition of all of the metal and fiber clutch plates, take a look at the clutch basket itself. The basket is notched with ears (sometimes called fingers) that grab hold of the sprocket-like extensions of the fiber plates. Carefully inspect these ears for grooves where the plates make contact. If there are markings on the basket here, it’s likely your clutch has been getting steadily more difficult to engage at the lever.
If everything mentioned above checks your visual inspection, reassemble in the reverse order. The best method of repair should one or more than one of the areas fail to check out is to purchase a complete clutch rebuild kit which most certainly will include a new basket, springs, fiber and metal clutch plates (hang on to your stock bolts just in case). And of course, each individual component is sold separately should a total rebuild prove unnecessary.
 If everything checks out but you still experience the telltale signs of clutch slippage or difficult gear engagement, there are a few other areas to consider. First and foremost are the clutch springs you encountered when you first removed the cover. Inadequate spring tension (from weak or well worn springs) is a major culprit of slippage and repeated premature wear to the plates/ basket. It’s often a good idea not to assume the answer is much heavier replacement springs as just as much stress-induced damage can occur by overcompensating. Buy and install OEM-spec springs to rule out inadequate tension caused simply by worn out stock parts. If this still doesn’t do the trick, it’s not a bad idea to alternate the stockers with more heavy-duty springs rather than to replace them all with heavier ones. So long as they are positioned to apply even pressure on the plates, this should offer up more tension without making it impossible to pull in the lever.
If after all of these considerations, the clutch still doesn’t feel as though it’s operating up to snuff, the final factors become even easier to handle: Check the cable for slack and replace if it is frayed or stretched. Finally make sure to properly set up the adjustment of the clutch lever itself.
Slippery Situation
Of course replacing one or all of the components of the manual clutch should automatically mean a complete oil change (including filter). Yes we know it’s tempting to cave in and run much more affordable automotive oil than motorcycle (and ATV) specific blends. In actuality it is in fact the clutch that prevents you from being able to do so. This is because a single-sump crankcase contains an oil supply that is circulated to lube the gearbox, clutch, crank, piston, and the valves. Sure auto oil may be up to the task of lubing up the piston and crank, it is generally too slippery for the wet clutch (which means clutch slippage for the rider).
Most cycle and ATV oils are formulated without moly additive, which makes them the sure-fire choice for the specific application. If in doubt, check the bottle for the phrase “designed for use with a wet clutch”.
Interestingly enough there is a situation where the oil used in the transmission/ clutch is kept entirely separate from the oil that lubes the top end and this is known as a dual sump system. How can you tell which you have? The best way is to consult your owner’s manual, shop manual, or to call your dealer and ask. If all of those methods prove unsuccessful, you will likely notice that you have to drain two separate oil pans to conduct an oil change.
The dual sump system uses an isolated oil supply to exclusively lube the piston, valve train, crank and rod and another supply for the clutch and gearbox. Since the engine oil never actually comes in contact with the transmission oil, we have managed to run automotive oil in the engine-side in a pinch. Of course the best bet is to always run the manufacturer-recommended formulation.
To discuss this article, click here