Warn 3.0ci Winch
|
What Is A Big
Machine Winch? |
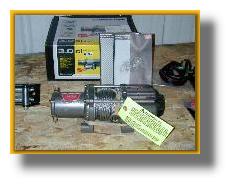 |
 The ATV world is changing rapidly, new models hit the press every few months. Manufacturers release models with larger engines, new concepts, and better innovations. The problem is most new machines are better than the past but these new machines have a tendency to gain weight. Take the new Traxter Max, this machine has a dry weight of 829 lbs! Could you imagine becoming stuck in a deep mudhole with a unit that heavy? Just think about it, you and a friend are just riding along a woods trail and being the adventurous type, you decide that your Traxter Max with Visco-lok (Bombardier�s premium Limited-slip front differential) can go anywhere. Only as you transverse the deep mudhole your Traxter becomes stuck. Even for two riders this machine is too heavy to lift or push out of the goop. What next? Walk back for help? Hope someone comes by? Send up a flare? No, you�re more intelligent to try anything that could put you and your guest rider in peril. Your Traxter Max is equipped with a new Warn 3.0ci winch and help is just a tug away. The new Warn 3.0ci winch is a 3000 lbs. (1360 kgs.) single-line winch with a 12V DC, 0.9hp (0.7kw) electric motor, with an included Remote Control, 10′ (3.0m) lead, and handlebar mounted Mini-rocker switch. This unit also is available with a Dynamic brake but a mechanical brake is available as an option (PN 65327). (CE version includes a mechanical brake). The 3.0ci winch has a weight of 19 lbs. (8.6kgs.) and uses 50′, 3/16″ diameter (15m, 5mm diam.) of wire rope. Lastly the 3.0ci uses a 136:1 gear ratio and offers a limited lifetime warranty.
 You probably have been thinking about purchasing a winch just because you understand that a machine this big would present a problem if the ATV ever did get stuck. Checking around you realize that this winch is about a 0.00 (U.S.) dollar item, and installation would run quite a bit more. Most ATV enthusiasts figure they can install the winch, it can�t be that hard. Well, a winch is a product we need to count on and we must make sure it is properly installed for safety as well as mechanical reasons. So let�s go through the installation process with you and hopefully help with any questions you may have. After purchasing the Warn winch we recommend reading the instructions, owners manual and the �The basic Guide to Winching Techniques� booklets which come with the product. A winch that is installed wrong could result in quite an accident.
problem if the ATV ever did get stuck. Checking around you realize that this winch is about a 0.00 (U.S.) dollar item, and installation would run quite a bit more. Most ATV enthusiasts figure they can install the winch, it can�t be that hard. Well, a winch is a product we need to count on and we must make sure it is properly installed for safety as well as mechanical reasons. So let�s go through the installation process with you and hopefully help with any questions you may have. After purchasing the Warn winch we recommend reading the instructions, owners manual and the �The basic Guide to Winching Techniques� booklets which come with the product. A winch that is installed wrong could result in quite an accident. Let�s get started. Pull your Traxter Max into a good work area with plenty of light. Remove the top 13mm. bolts on the front rack, the directions say to loosen but not to remove the top bolts. We found it easier to remove these top bolts and leave the bottom bolts in, this enables the bumper to fold down and out of the way. Next 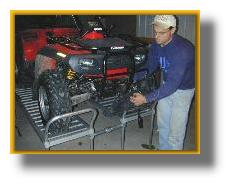 using a #2 Phillips screwdriver and 10 mm. wrench, remove the plastic brush guard from front of ATV. Now that the plastic is out of the way remove the (4) upper frame bolts but only loosen the two bottom frame bolts, this will allow the bumper to fold down and out of the way. The existing bracket will need to be replaced with the new Warn winch mount. At this point it will be necessary to switch rotation of the winch, don�t get too excited. All they mean for us to do is loosen the motor from the winch housing and rotate the motor so that the power leads are rotated 90 degrees.
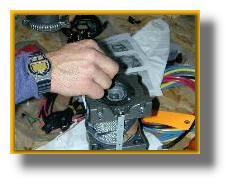 Warn supplies instructions with decent photos. Step one is very important, apply a length of black tape across the end cap of the electric winch motor. The cap does not need to be removed, behind this cap are the inner workings of the electric motor and removing this cap can cause the brushes to slip out of place and we don�t want to have that problem. Now that the two 3/8 head, motor bolts have been removed also remove the 3/16 allen screws this will allow the winch motor to be lifted from the drum portion of the winch. Next remove the rubber gasket and turn 90 degrees counter clockwise to the next set of bolt holes, then with a screwdriver twist the motor coupler the same rotation(90 degrees). Make
 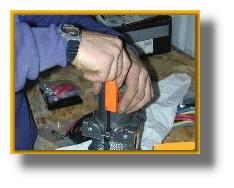 sure the gasket is in alignment and reinstall the 3/8 motor bolts into the new motor mounting holes, remember don�t make this more difficult then it is. All we did was twist the motor and reline the mounting bolts into two new holes, this enabled the power leads to be rotated 90 degrees and will keep the power supply away from any metal frame work when bolted into place on the ATV. With that out of the way, bolt the winch to the Warn supplied winch mount using supplied 5/16 socket head screws. Put the winch bracket and winch in place and reinstall the (4) original 13 mm. bolts into the ATV frame. Place the bumper back in its proper place and tight up all bolts. Replace the plastic brush shield, place the roller fairlead in place and tighten all bolts. Run the winch cable through fairlead and install the hook-end. This has turned out to be quite a project, but we are only half way finished.
using a #2 Phillips screwdriver and 10 mm. wrench, remove the plastic brush guard from front of ATV. Now that the plastic is out of the way remove the (4) upper frame bolts but only loosen the two bottom frame bolts, this will allow the bumper to fold down and out of the way. The existing bracket will need to be replaced with the new Warn winch mount. At this point it will be necessary to switch rotation of the winch, don�t get too excited. All they mean for us to do is loosen the motor from the winch housing and rotate the motor so that the power leads are rotated 90 degrees. Warn supplies instructions with decent photos. Step one is very important, apply a length of black tape across the end cap of the electric winch motor. The cap does not need to be removed, behind this cap are the inner workings of the electric motor and removing this cap can cause the brushes to slip out of place and we don�t want to have that problem. Now that the two 3/8 head, motor bolts have been removed also remove the 3/16 allen screws this will allow the winch motor to be lifted from the drum portion of the winch. Next remove the rubber gasket and turn 90 degrees counter clockwise to the next set of bolt holes, then with a screwdriver twist the motor coupler the same rotation(90 degrees). Make sure the gasket is in alignment and reinstall the 3/8 motor bolts into the new motor mounting holes, remember don�t make this more difficult then it is. All we did was twist the motor and reline the mounting bolts into two new holes, this enabled the power leads to be rotated 90 degrees and will keep the power supply away from any metal frame work when bolted into place on the ATV. With that out of the way, bolt the winch to the Warn supplied winch mount using supplied 5/16 socket head screws. Put the winch bracket and winch in place and reinstall the (4) original 13 mm. bolts into the ATV frame. Place the bumper back in its proper place and tight up all bolts. Replace the plastic brush shield, place the roller fairlead in place and tighten all bolts. Run the winch cable through fairlead and install the hook-end. This has turned out to be quite a project, but we are only half way finished.Now remove all the switches and wiring including the isolator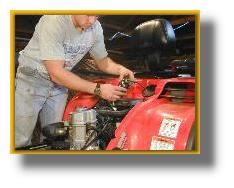 block from the packaging. You will need to find a location for the isolator block, this block will hold and connect all the wiring to the winch in one area. Naturally this needs to be placed in a safe location where nothing can short out and within reach of the supplied wiring. After looking at several locations, we decided that the inner air duck of the Traxter Max would work fine, this air duct supplies fresh air to the radiator and its fan. The location we picked looked as though it would meet all our wiring needs without impeding cooling capabilities of the Traxter Max. With the location found all we needed to do was mount the isolator and run the main wires from the winch to the isolator, including the battery leads to the isolator. Mount the handle bar rocker switch using the supplied hardware and run the power cord down along the control cables to the rear, plugging these connectors into the isolator. Lastly, the 3.0ci Warn winch is supplied with an additional hand operated switch. Finding a location to mount the plug for the hand switch was quite simple. The Traxter Max has aplastic fairing around the
  headlight, the opposite side from the 12 volt accessory outlet, this position is the perfect spot for mounting the hand operated winch switch outlet. Drill an appropriate size hole into the fairing and run the wring through the hole and down the steering shaft just along the control cables, make sure that the steering turns free and nothing binds up. (Note: Anytime you run wiring make sure the wires are run away from heat and free from sharp edges, also use plenty of wire ties and try to use the route that all other cables and wires are using.) At this point check everything, check your wiring routes,
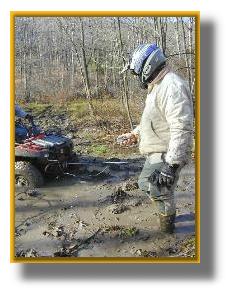 check to make sure all the bolts have been tightened and check the location of your isolator block. Make sure everything is in working order before you test the unit. Another piece of advice we like to give is always keep your winch in the fee spool mode, the winch has a twist type knob on the left side of the unit which can lock and unlock the spool. Accidental engagements are not a problem if the winch in the unlocked position, if for some reason another person should push the in button of the winch switch, you will not over tighten the cable. That�s it! Be sure to use all safety straps and follow the winching rules, be sure to test the winch and keep an eye on the cable. Over time heavy use could cause the cable to fray and become weak, replace when necessary. Look to the Warn Industries web-site [www.warn.com] for more information, and enjoy.
block from the packaging. You will need to find a location for the isolator block, this block will hold and connect all the wiring to the winch in one area. Naturally this needs to be placed in a safe location where nothing can short out and within reach of the supplied wiring. After looking at several locations, we decided that the inner air duck of the Traxter Max would work fine, this air duct supplies fresh air to the radiator and its fan. The location we picked looked as though it would meet all our wiring needs without impeding cooling capabilities of the Traxter Max. With the location found all we needed to do was mount the isolator and run the main wires from the winch to the isolator, including the battery leads to the isolator. Mount the handle bar rocker switch using the supplied hardware and run the power cord down along the control cables to the rear, plugging these connectors into the isolator. Lastly, the 3.0ci Warn winch is supplied with an additional hand operated switch. Finding a location to mount the plug for the hand switch was quite simple. The Traxter Max has aplastic fairing around the headlight, the opposite side from the 12 volt accessory outlet, this position is the perfect spot for mounting the hand operated winch switch outlet. Drill an appropriate size hole into the fairing and run the wring through the hole and down the steering shaft just along the control cables, make sure that the steering turns free and nothing binds up. (Note: Anytime you run wiring make sure the wires are run away from heat and free from sharp edges, also use plenty of wire ties and try to use the route that all other cables and wires are using.) At this point check everything, check your wiring routes, check to make sure all the bolts have been tightened and check the location of your isolator block. Make sure everything is in working order before you test the unit. Another piece of advice we like to give is always keep your winch in the fee spool mode, the winch has a twist type knob on the left side of the unit which can lock and unlock the spool. Accidental engagements are not a problem if the winch in the unlocked position, if for some reason another person should push the in button of the winch switch, you will not over tighten the cable. That�s it! Be sure to use all safety straps and follow the winching rules, be sure to test the winch and keep an eye on the cable. Over time heavy use could cause the cable to fray and become weak, replace when necessary. Look to the Warn Industries web-site [www.warn.com] for more information, and enjoy.