HOW TO carb adjustment on any Chinese atv. Kazuma, Yamoto, Redcat, Baja, Sunl, etc...
#261
 07-24-2011, 08:05 PM


2manytoys,
I just read your article on carb adjustments. We bought our daughter an ATA110-B and initially had issues with it staying running. We received a new carb and replaced it and now it stalls whenever you release the throttle. We have only had it running about 20 minutes total. We were told that it's probably a safety feature, but we are unable to let it idle for any amount of time. Do you think the gelpac could be our issue? Thanks!
I just read your article on carb adjustments. We bought our daughter an ATA110-B and initially had issues with it staying running. We received a new carb and replaced it and now it stalls whenever you release the throttle. We have only had it running about 20 minutes total. We were told that it's probably a safety feature, but we are unable to let it idle for any amount of time. Do you think the gelpac could be our issue? Thanks!
#262
10-05-2011, 07:39 PM
Trailblazer
First of all I'm new to this forum but from reading here there is a tremendous depth of knowledge around and for that I am thankful. Thanks very much for sharing guys. Now on to my problem.
I purchased a 110cc Chinese quad for my grandson. It was suppose to be a basket case engine wise the owner said the piston froze up. Price was right and the body frame tires showed little wear and the machine was fairly clean in the hard parts to get to showing little use. Anyway I brought it home and pulled the plug, it was black. Then removed the cover and tried to turn the crank, No go it was stuck. Put in some Marvel Mystery oil and started taking off body parts to get it to the bare frame.
I pulled the carb and it was coated inside an out with dirt and sand. Took the carb apart, jets, float, needle valve, everything and tanked the parts that wouldn't melt for 8 hours including the intake. Carb came out like new and I reassembled it. Did nothing but wipe off and clean the jet needle on the throttle.
Meanwhile I put the ratchet back to the crank and low an behold the piston freed up and just got better with each turn. Bike had lots of other little problems the worst of which was the starter. The solenoid just clicked when I hit the start switch (new batt) and there was 12 volts getting to the starter. Removed the starter and pulled the case. brushes were good but one was missing a spring and had no way to make contact. It looked a mess so I just picked up a new one. I wanted to spin the engine to get a compression test. My gauge wouldn't fit the little plug hole so I just turned the engine over with my thumb over the hole and it seemed to have fairly good compression.
With all that done I installed a fuel filter, cleaned the tank and petcock, changed the oil and put fresh fuel in the tank. set the air screw out 2 1/2 turns and the idle screw out 3 turns. Choke on full and hit the starter. I cranked right up and I had to keep just a little throttle on to keep it running. after warming up it cranks straightaway and got it to idle fast with the choke on full but if I open the choke much at all it dies. The idle seems to "hunt" all the while I let it sit (5-10 minutes). I tried to start from square one and put the air screw out 2 turns and played with the idle screw but as soon as I take the choke off it dies. I am able to keep it running with about 1/4 throttle and the choke fully open (warmed up) but idle adjustment and air screw seem to have no effect in this condition. I will rev up and seems to run smooth at the higher rpms but will just die when the throttle is released.
now I'm thinking something in that throttle needle needs adjusting. I read the post about how to do that and it will be no problem for me but I'm a car guy and just not really getting my head wrapped around this needle valve setting.
not even sure if that's the problem as this is the first one of these little engines I have fooled with. Any help or idea appreciated.

 ? Thanks!
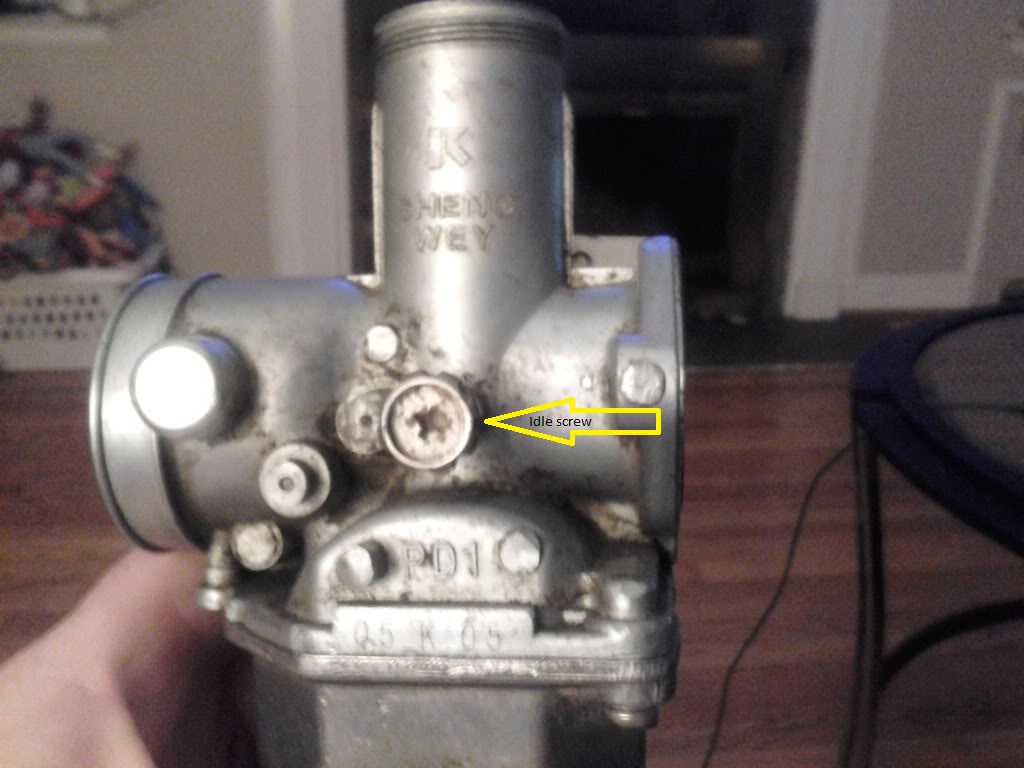
#264
11-20-2011, 09:32 PM

#265
11-21-2011, 06:29 AM
Trailblazer
I just bought a used kazuma and I am having problems like mentioned. It will run after a little while but once I hit the throttle it will stall. I know nothing about these but I am handy. I would love to DIY but would need seriously good instructions with lots of pictures
Can anyone help
Can anyone help
Dirt, debris, varnish, corrosion or other blockages and/or other restrictions in the slow jet and idle circuit of the carb.
I have spent literally days and many hours removing, disassembling, cleaning re-installing, tuning and then doing the entire process over and over trying different things to get improved operation.
I have 7 vehicles ranging from a 650 Honda down to a little 49cc scooter and a Meerkat. All have some slide type carb and all are designed to do the same thing, just various ways and have different parts. All of these I purchased after the previous owners had just given up on getting them running and all of them (except one waiting for parts) are running now.
In every case, the problem began, and is a result off neglect and not running an inline fuel filter (IMHO). Also in every case even after cleaning, they all had some issue with idling and transition from 0 throttle to about � throttle. This led me to seriously look at the slow jet or pilot jet as that controls the range in question.
I have use carb cleaner (spray can) and chem-dip that I have use for years. Both do a great job but you have to make sure you absolutely have the slow jet and it�s internal circuit totally clean if you ever hope to get a proper idle and transition through � throttle. Years of running all sorts of fuel and who knows what through these little carbs, coupled with sitting unused will cause residue to build up and corrosion to take hold of the jet and passages in the circuit. Just as bad eating habits will cause plaque to build up in the heart and arteries, a similar process takes place in the carburetor. (the heart of the vehicle). Parking one for any length of time will leave a varnish everywhere fuel was present and as the fuel evaporates it leaves the solids (varnish for lack of a better word) to restrict the flow of fuel.
In my case after cleaning and tuning one carb I could just never get it to idle and run up correctly. So I gave the carb body and slow jet a serious ride in an ultrasonic cleaner. (any professional bike shop will have one if they do carburetors). I have a cheap one I got at Harbor freight for about $75 using a 20% off coupon taking the cost down to around $55 bucks. They also have a smaller one but larger carb bodies won�t fit in.
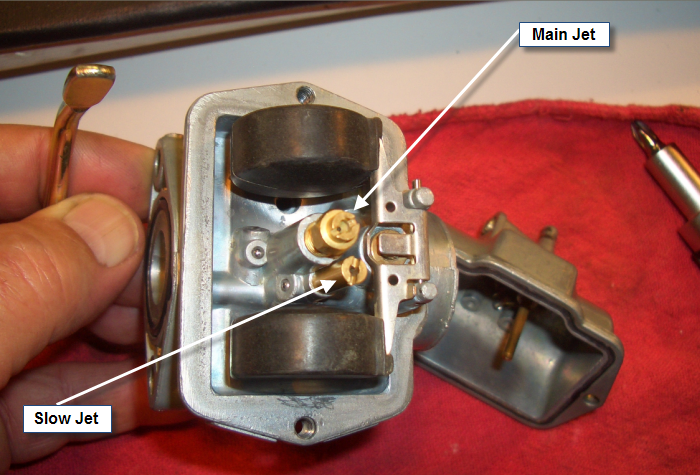
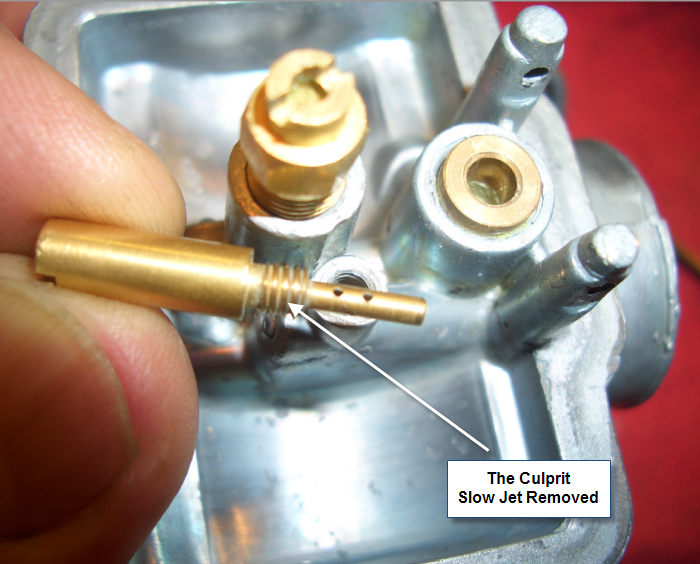
I had a carb off my 50CC Kuzuma Meerkat available to fillet and take some photos for you so here goes. This first one is the bottom of the carb with the bowl removed. Note which jet is which. The larger one in the center is the main jet and the one right next to it is the slow jet. This is the one that can be a problem if not cleaned completely. Those little holes in the side are frequently blocked and the hole straight through the center will usually be blocked and over looked. Look down through this jet and make sure you can see daylight. The opening is very small (something like .018) and is easily plugged up or restricted. You might get something like the �e� string from a guitar through it if you sharpen the point a bit. Get some carb cleaner into it and make a drilling motion until the opening is clean and clear. Don�t force it too much you don�t want to score the brass which will mess up the flow. (I told you it�s small) Unless these opening are clear and clean you will never get the machine to run properly. Believe me on this one. The only other option is to just buy a kit and put in a new set of jets.
Having made sure the jet itself is clean and clear you need to make sure the circuit it feeds is clear. Put plenty of cleaner into the slot it screws into and blow it out with compressed air. A good compressor with about 100-125 psi and an air chuck with a rubber tip is best to really clear it out. Pay attention to the area inside the throttle body where the fuel shoots out. �SEE� that the cleaner is coming out the other side unrestricted. Once you have done all this you can have confidence that the idle circuit can do it�s job.
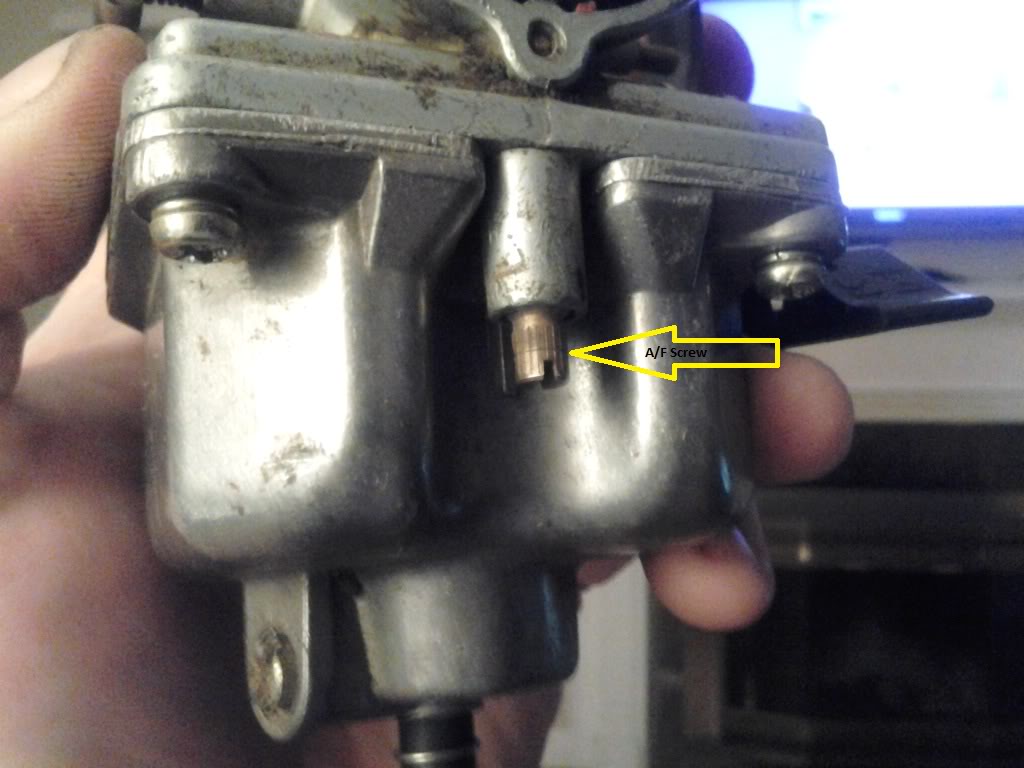
I went ahead and took a photo of all the jets and screws in this carb. Notice the Air mixture screw has a spring, washer and rubber O ring. They are in the order they go into the cavity. I have found the O ring stuffed sideways, or missing. Remember, you never know what someone else has done and it�s possible someone who had no idea what they were doing had a go at this thing before you got it.

I have a couple of classic bikes that parts are scarce and when you can find them, expensive. So, I learned to simply �make do�. I had much rather have the satisfaction of fixing something than simply �remove and replace�. I will say that with these type of carburetors sometimes it�s cheap to just buy a new one. Some of the smaller ones can be found for 20-30 bucks online but that would take all the fun out of it. LOL So, don�t be afraid of it crack �em open and see what make them tick, the worst case is you mess it up and spend 30 bones on a new one. The best case is you will gain the power of knowledge and satisfaction of doing for yourself. Something no one can ever take from you.
I'm not saying this is what will cure your particular problem as a couple of other things mentioned CAN produce the symptoms described. I am saying that persistent idle problems are likely a result of what I have described. That part of the carb is highly sensitive to any obstruction and in my experience, after doing what I though was a through job I discovered after much trial and error that what I thought was complete was not.
When you finish put an inline filter on and drain the carburetor bowl if the bike is not to be used for a couple months after putting some Stabil. The cost of taking these precautions is minimal compared to what dead fuel, time and corrosion will end up costing you, not to mention the aggravation of a crappy running bike.
Hope this helps it took me a couple hours to put together but is my attempt to �pay it forward� as I have gained knowledge from others on this forum. Lots of smart folks hanging around here, I will try to check in more often.
#266
11-21-2011, 06:48 AM
Trailblazer
I was just wondering if I have these correct ? Thanks!
Depending on the model carb the air/fuel mixture screw (properly called the idle mixture screw) can be at the bottom of the bowl or just below the opening to the throat of the carb.
They both accomplish the mission of adjusting the mixture of fuel and air but differently. The one like yours on the bottom controls the mixture by controlling the fuel in the mix and the one that has the screw on the bottom of the throat accomplishes the same thing by controlling the air in the mix. So, on yours you richen up the mix by turning the screw counter clockwise which adds fuel and turning it clockwise would lean it out taking away fuel and allowing more air into the mix.
The other style is just the opposite because it controls only air into the mix so, counter clockwise on that style would lean out the mixture because it's adding air. Conversely turning this style screw clockwise restricts air into the mixture and by allowing more fuel than air it will richen the mixture.
The reason I mention this is, it's kinda important to know which style you have. Both accomplish the same thing but in opposite directions.
Two ways to skin a cat ... both looking for an air to fuel ratio of about 15:1.
Simple eh?
#267
11-21-2011, 11:18 AM
I've read somewhere on here that it is very helpful and inexpensive to purchase new and larger jets. Can someone please advise on where to purchase and if it really is worth it?
Thanks, please keep the pictures coming.
I would like to perform an oil change but not sure what to clean the screen with?
My manual also says to use 10w-40 oil is that correct?
Thanks, please keep the pictures coming.
I would like to perform an oil change but not sure what to clean the screen with?
My manual also says to use 10w-40 oil is that correct?
#268
11-21-2011, 01:59 PM
Trailblazer
I've read somewhere on here that it is very helpful and inexpensive to purchase new and larger jets. Can someone please advise on where to purchase and if it really is worth it?
Thanks, please keep the pictures coming.
I would like to perform an oil change but not sure what to clean the screen with?
My manual also says to use 10w-40 oil is that correct?
Thanks, please keep the pictures coming.
I would like to perform an oil change but not sure what to clean the screen with?
My manual also says to use 10w-40 oil is that correct?
All the four strokes I get I drain and replace the oil with 20W50 Royal Purple, a synthetic oil available at Walmart or any parts store. Folks have different opinions and if you have any doubts following the manual never really hurts.
As far as oil screens go I usually clean them with some carb cleaner and fiber brush. I'm sure there's other stuff but so far that gets the job done for me. Just know what kind of material the screen is made from and don't use something that might eat it up. I say that because I don't know what the Chinese are liable to use for material as they tend to make stuff as cheap as possible.

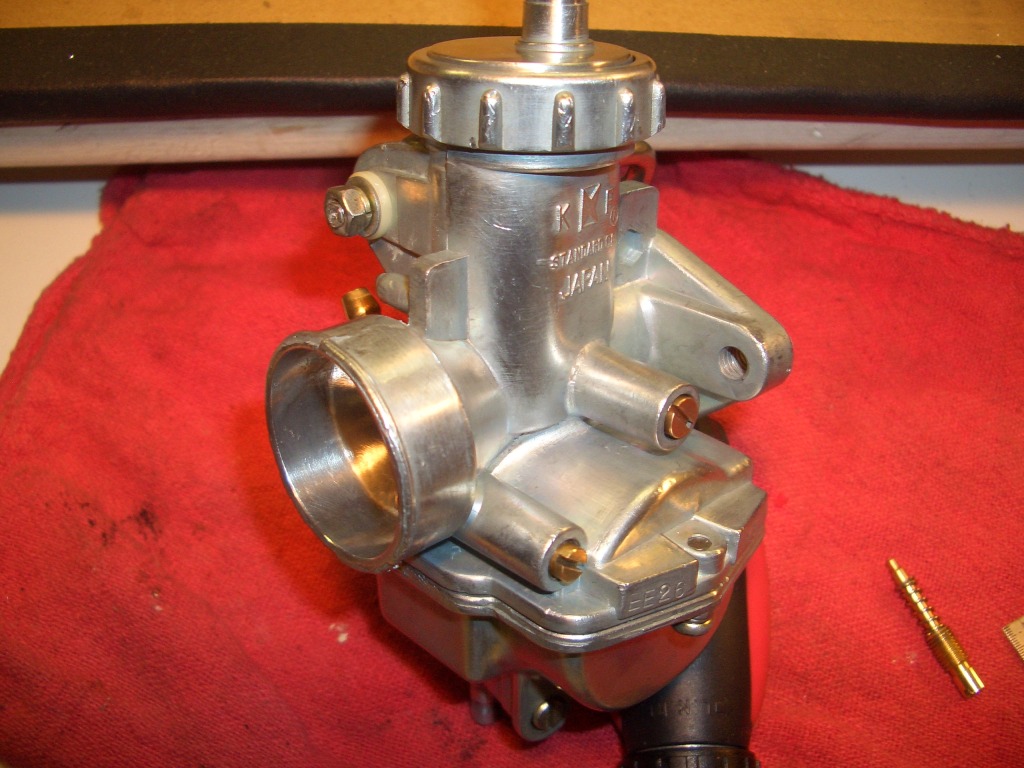
Since I had that little Meerkat carb out for the photo's earlier I decided to go ahead and clean it. Here it is all put back together. The screw laying there was in the kit I ordered and I did not like the fit of the thing. It stuck way out of the body so, I used the original idle adjustment screw. Wish I had taken some shots of this thing when I first got it, it was a real mess coated inside and out with who knows what.
#269
02-11-2012, 05:49 PM

The opening is very small (something like .018) and is easily plugged up or restricted. You might get something like the �e� string from a guitar through it if you sharpen the point a bit. Get some carb cleaner into it and make a drilling motion until the opening is clean and clear. Don�t force it too much you don�t want to score the brass which will mess up the flow.
#270
02-14-2012, 07:34 AM
