
3M Vinyl Wrap
 Nov 26, 2011 | 05:50 AM
#2

Range Rover
Joined: Nov 2007
Posts: 178
Likes: 0
I used one I got from AMR on my DS650, I don't know if it was 3M film or not, but I followed the procedure for cleaning and prep, only I used acetone nail polish remover and isopropyl alcohol instead of whatever cleaning solution they sold. It wasn't too bad to put on and so far I haven't noticed any peeling up, it's been about 6 months.
Nov 27, 2011 | 07:17 AM
#5
Trailblazer
Joined: Oct 2010
Posts: 48
Likes: 1
I just got done wrapping my bike last week and it looks amazing!!!!
I used the 3M wrap from "Mossy Oak Graphic".
Mossy Oak Graphics ATV Camo Kit Installation Instructions - YouTube
Here's the BEFORE ....
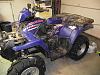
And now the AFTER....

I did learn a few things while doing this wrap.
1. Clean, clean, clean, the bike has to be spotless. Use a good wax and grease remover. Before I applied the wrap I wiped down every piece of plastic with 70% isopropyl alcohol.
2. Be sure to buy the "3M 94 Primer"! It's a must in the concave curves of the plastics.
3. A heat gun is critical to getting a nice finish.
4. Re heat the entire bike with the heat gun and squeegee out all the air pockets and wrinkles. BECARFUL NOT TO MELT THE VINYL.
5. If you order from Mossy Oak Graphics, ask for 2 extra feet of vinyl.
The 7 feet in the kit just seems to not be enough material. A 9 foot role is what you want just incase you make a mistake applying the wrap. When you order, use the Discount Coupon (BIGGAME) for 10% off your order and free shipping. Last week I paid $162 for 9 feet
6. Make sure the camo pattern is the right way before cutting it off the roll. I made the mistake of cutting the pattern the wrong way and had to piece the front fender together.
7. If you make any mistakes with the heatgun (burn a small hole) dont worry too much about it. What I did was when i was finished the entire bike I took a scrap piece of vinyl and cut out a leaf or an acorn and stuck it over the little holes I made with the heatgun. This does 2 things, first it makes it look better but secondly it seals the vinyl so water cant get in. Remember to use the heatgun on the patches too. The heat will seal them on.
I hope this helps.
I used the 3M wrap from "Mossy Oak Graphic".
Mossy Oak Graphics ATV Camo Kit Installation Instructions - YouTube
Here's the BEFORE ....

And now the AFTER....
I did learn a few things while doing this wrap.
1. Clean, clean, clean, the bike has to be spotless. Use a good wax and grease remover. Before I applied the wrap I wiped down every piece of plastic with 70% isopropyl alcohol.
2. Be sure to buy the "3M 94 Primer"! It's a must in the concave curves of the plastics.
3. A heat gun is critical to getting a nice finish.
4. Re heat the entire bike with the heat gun and squeegee out all the air pockets and wrinkles. BECARFUL NOT TO MELT THE VINYL.
5. If you order from Mossy Oak Graphics, ask for 2 extra feet of vinyl.
The 7 feet in the kit just seems to not be enough material. A 9 foot role is what you want just incase you make a mistake applying the wrap. When you order, use the Discount Coupon (BIGGAME) for 10% off your order and free shipping. Last week I paid $162 for 9 feet
6. Make sure the camo pattern is the right way before cutting it off the roll. I made the mistake of cutting the pattern the wrong way and had to piece the front fender together.
7. If you make any mistakes with the heatgun (burn a small hole) dont worry too much about it. What I did was when i was finished the entire bike I took a scrap piece of vinyl and cut out a leaf or an acorn and stuck it over the little holes I made with the heatgun. This does 2 things, first it makes it look better but secondly it seals the vinyl so water cant get in. Remember to use the heatgun on the patches too. The heat will seal them on.
I hope this helps.
Nov 27, 2011 | 08:16 PM
#6

Thread Starter
|
Weekend Warrior
Joined: Aug 2011
Posts: 23
Likes: 0
Thanks for the input, your bike looks brand new... What a difference it made... $160 is alot cheaper then paint! good paint, reducer and misc. will run double that and if it starts to flake then your screwed.
Thanks
Thanks

Thread
Thread Starter
Forum
Replies
Last Post
Ricardo Covarrubias
Kids Quads & Other ATV's - Ask an Expert!
1
Sep 17, 2015 08:28 AM
Currently Active Users Viewing This Thread: 1 (0 members and 1 guests)