2008 SP 800 Reverse override How do I do it??


#12
 03-31-2009, 01:20 AM
Pro Rider
Join Date: Nov 2008
Location: eden valley mn
Posts: 1,232
Likes: 0
Received 0 Likes
on
0 Posts
i looked at a wire diagram. theres 3 wires involved. dosent it have to disconect power from one wire to the other??? to make it go faster4x4 in reverse?
#13
03-31-2009, 03:25 AM
#14
03-31-2009, 04:04 AM
Pro Rider
Join Date: Nov 2008
Location: eden valley mn
Posts: 1,232
Likes: 0
Received 0 Likes
on
0 Posts
#15
03-31-2009, 07:14 AM
Pro Rider
Check out my post from last week on the mod. It has instructions on how to do the override with a toggle switch and the three headlight conversion with a relay. Haven't been able to post pics yet but it is pretty straight forward. On the reverse override you are only tapping in to two wires(gray/orange form the 16 pin connector in the headlight pod and the brown wire on the cig lighter/accessory plug). When the toggle is turned on you will not need to use the yellow override button. To use the button to scroll through the different cluster views all you need to do is turn the switch off. Hope this helps!
#16
03-31-2009, 07:18 AM
Pro Rider
Join Date: Apr 2008
Location: Maine
Posts: 399
Likes: 0
Received 0 Likes
on
0 Posts
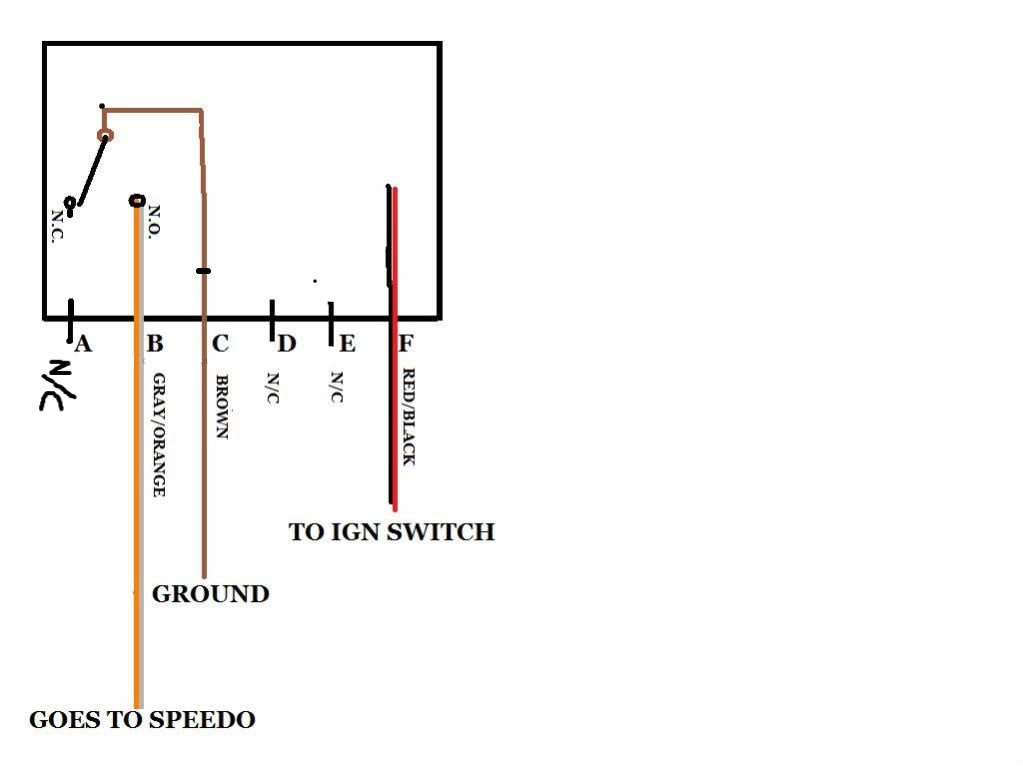
Chuck � which service manual did you draw the schematic from? I think the wire you are showing jumping between �A� and �F� is actually just a depiction of the connector in the service manual. As you can see from your graphic � if that was a wire you would be shorting your 12v from the Red/Black wire to Ground on the Brown wire. That would be a BAD thing.
Now remove that wire from your graphic and the circuit becomes quite simple. The "blade" where the Brown wire (Ground) is connected to. A Normally Closed pole (N.C.) but no wires are connected to this pole, and a Normally Open pole (N.O.) which the Gray/Orange wire is connected to. When you push the Reverse Override button you are moving the blade to the N.O. pole thereby connecting the Brown wire to the Gray/Orange wire (thereby putting a ground on the Gray/Orange wire). When you install the Quadovator kit you will be installing a switch between the Gray/Orange wire and the Brown wire. Now instead of having to hold in the button for reverse override you just flick the Quadovator switch.
As a note, the Quadovator switch closes the circuit the same as the factory installed switch does - just that the factory installed switch is a momentary switch whereas the Quadovator is not. Installing this kit does not change the electrical characteristics of the circuit.
#17
03-31-2009, 04:07 PM

#18
03-31-2009, 04:17 PM
#19
03-31-2009, 06:54 PM
Pro Rider
Join Date: Nov 2008
Location: eden valley mn
Posts: 1,232
Likes: 0
Received 0 Likes
on
0 Posts
[QUOTE=*5 J's*;2768717]Chuck � which service manual did you draw the schematic from? I think the wire you are showing jumping between �A� and �F� is actually just a depiction of the connector in the service manual. As you can see from your graphic � if that was a wire you would be shorting your 12v from the Red/Black wire to Ground on the Brown wire. That would be a BAD thing.QUOTE]
after zooming closer on the wire diagram. yes you are right. my bad..... i will change it.
chuck
after zooming closer on the wire diagram. yes you are right. my bad..... i will change it.
chuck
#20
03-31-2009, 08:01 PM