


Suzuki LTF250V Search & Rescue build
 Dec 7, 2014 | 06:04 PM
#1

Thread Starter
|
Weekend Warrior
Joined: Nov 2014
Posts: 13
Likes: 0
From: Shelton, Washington
 Suzuki LTF250V Search & Rescue build
My name is Gary and I live in Beautiful Mason County Washington. This is about 20 minutes North of Washington States Capitol city of Olympia. Feeling like I didn’t have enough to do with home repairs, a family and two sailboats (a Coronado 25 and an 18 foot Hobie Cat), I decided to join the local Sherriff’s Office Search & Rescue unit. After the initial six months of training, I became what we affectionately call a “Ground Pounder”. Basically you put the rubber to the ground and go cross country through every terrain imaginable. After a couple of years of this, I moved over to the “Dark Side”. That would be the mobile division. This is usually 4x4 capable vehicles used in hasty searches of dirt roads, navigable tracks and the transporting of SAR personnel.
Having experienced the usefulness of smaller vehicles in this case, I decided a quad would be very useful. It has off-road capabilities, is small, able to get into trails & tracks that a full-sized rig wouldn’t and consumes a LOT LESS GAS. As luck would have it, about this time a co-worker was cleaning out his garage and asked if I could use his old Quad. I asked a few questions and was told it hadn’t been run in 3 years, needed a new battery, had a shot front wheel bearing and the front brakes needed work. But I couldn’t resist the price (free) and so I soon had a 97’ Suzuki LTF250 V parked in my shop.
I know some very mechanically handy local boys so with my trusty steed loaded up in the back of my Ford pick-up truck, off I went. Spending the better part of a Saturday afternoon, we tore the carburetor, the fuel petcock and fuel pump down for cleaning and inspection. We were pleasantly surprised to find everything bone dry with almost no dirt or residue build up. We put everything back together and in short order the quad was running and purring like a kitten. The wheel bearing took about an hour to fix. I purchased an “All-*****” bearing kit off E-Bay for $20.00 with free shipping. Installation was pretty straight forward. The brakes weren’t a big deal, turned out to be stuck due to little use. We backed the adjuster off and then bled the brakes. They seem to work fine now. I had a battery kicking around my shop that seems to start the thing up just fine. It’s smaller than the stock battery and will upgrade it as I have time and money.
As search and rescue quads go, this one wasn’t a bad unit, but it wasn’t what most SAR-ATV operators would recommend. On the negative side, it didn’t have 4x4 capability, didn’t have a winch and was of smaller displacement than most would have liked. On the other hand, as I have said, initial cost was free, ran great, was completely intact, and had front & rear cargo racks. Additionally, after reading various posts on the NET, I learned that these rigs, due to their longer wheelbase, are fairly stable and handle slippery conditions better than expected. This quad comes standard with a low gear and reverse.
I looked around on the internet but really didn’t find much about quad builds for SAR work. I figured if I was going to make mine more useful for SAR I would post what I did and began my upgrades. While scrounging around our SAR warehouse, I managed to find a cargo box for the rear rack. Installation took about a half hour and added a lot of secure, dry storage with virtually no weight gain.
Next, I decided I needed a “cargo tray” for the front rack. From my stash of scrap lumber I found some suitable pieces of ¾ inch plywood. I took some measurements and roughed up a base of sorts. To this I added vertical rails, gluing and screwing them to the base. I used a cut-out tool with a router bit, smoothed and rounded off all the edges.

To this I added a total of three layers of epoxy resin and filled and radiused the facing sides.

When the last coat of filler was done and sanded, I used a can of Krylon flat green and painted the tray. Nice part about this was the green was a close match to the original plastics.

Next, I decided I needed a way to mount a couple of antennas to the rear rack. Having some experience with customizing an antenna bracket on one of my other SAR rigs, I figured I could come up with something that would fit the bill. I took a piece of 1 inch OD pipe and cut it lengthwise on a chop saw with a metal cutting disk. Then I took a piece of 1/8 inch thick angle iron and cut a piece about 3 and a half inches long. I arc welded the “half-pipes” to the top and bottom of the angle iron.

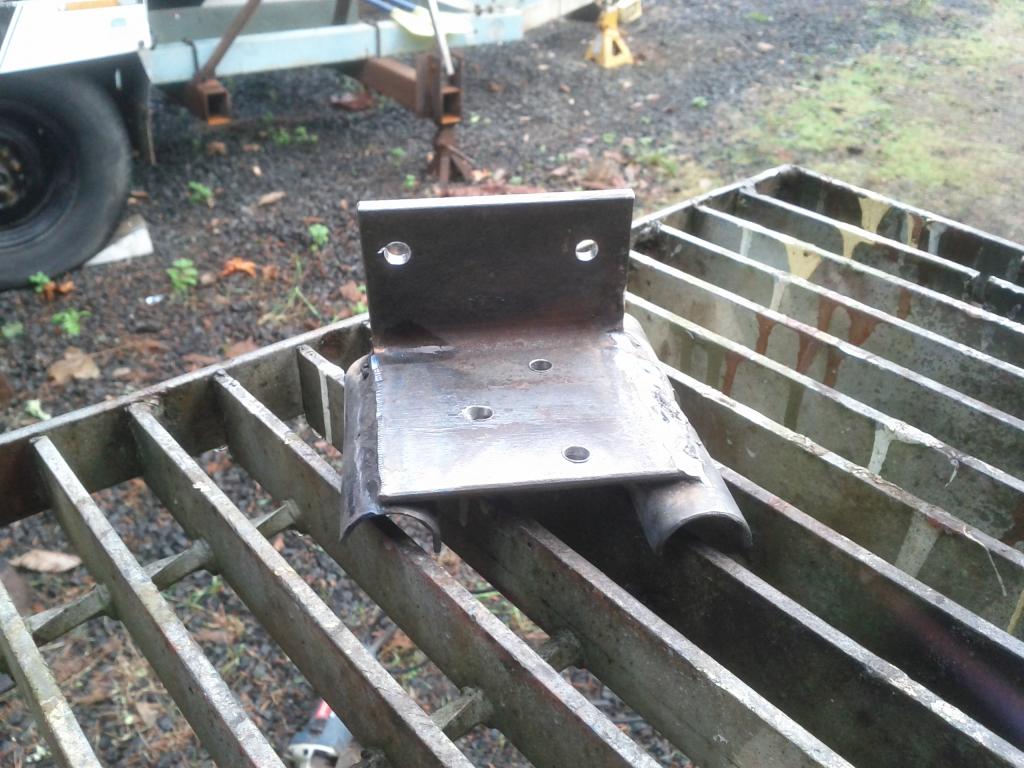
Next I cut a back plate and drilled three mounting holes on both pieces. So when everything was done, I would have a mount that uses the cargo rack to keep it secure and doesn’t allow it to twist or turn. Once this was finished I painted it with some black “Stove” paint. This stuff is tough to begin with, but I also used a trick I came up with on the last antenna mount. I uses a standard propane blow torch and heated the metal up for a couple of minutes. Then I hit it with the paint. It sticks well and cures fast and it seems to last.
I am pretty happy with results and have a few more mods to go. One of my old SAR rigs was a Ford Bronco II. It came to me with a brush guard and winch plate. Funny thing was, the winch was from Harbor Fright and designed for quads! When I sold it, the buyer wanted to dicker so I kept some gear, including the winch. I will need to spend some time coming up with a proper mount for it. I would have preferred to mount the winch on the back, but the exhaust is kinda in the way, so I may end up putting it on the front. I found some decent off-road LED lights on Amazon. These run $30.00 plus shipping. I hope to add these soon. Since this will be a work in progress, I hope to add pictures and content as I go. If you have done similar work or have ideas, I would love to hear them.
Having experienced the usefulness of smaller vehicles in this case, I decided a quad would be very useful. It has off-road capabilities, is small, able to get into trails & tracks that a full-sized rig wouldn’t and consumes a LOT LESS GAS. As luck would have it, about this time a co-worker was cleaning out his garage and asked if I could use his old Quad. I asked a few questions and was told it hadn’t been run in 3 years, needed a new battery, had a shot front wheel bearing and the front brakes needed work. But I couldn’t resist the price (free) and so I soon had a 97’ Suzuki LTF250 V parked in my shop.
I know some very mechanically handy local boys so with my trusty steed loaded up in the back of my Ford pick-up truck, off I went. Spending the better part of a Saturday afternoon, we tore the carburetor, the fuel petcock and fuel pump down for cleaning and inspection. We were pleasantly surprised to find everything bone dry with almost no dirt or residue build up. We put everything back together and in short order the quad was running and purring like a kitten. The wheel bearing took about an hour to fix. I purchased an “All-*****” bearing kit off E-Bay for $20.00 with free shipping. Installation was pretty straight forward. The brakes weren’t a big deal, turned out to be stuck due to little use. We backed the adjuster off and then bled the brakes. They seem to work fine now. I had a battery kicking around my shop that seems to start the thing up just fine. It’s smaller than the stock battery and will upgrade it as I have time and money.
As search and rescue quads go, this one wasn’t a bad unit, but it wasn’t what most SAR-ATV operators would recommend. On the negative side, it didn’t have 4x4 capability, didn’t have a winch and was of smaller displacement than most would have liked. On the other hand, as I have said, initial cost was free, ran great, was completely intact, and had front & rear cargo racks. Additionally, after reading various posts on the NET, I learned that these rigs, due to their longer wheelbase, are fairly stable and handle slippery conditions better than expected. This quad comes standard with a low gear and reverse.
I looked around on the internet but really didn’t find much about quad builds for SAR work. I figured if I was going to make mine more useful for SAR I would post what I did and began my upgrades. While scrounging around our SAR warehouse, I managed to find a cargo box for the rear rack. Installation took about a half hour and added a lot of secure, dry storage with virtually no weight gain.
Next, I decided I needed a “cargo tray” for the front rack. From my stash of scrap lumber I found some suitable pieces of ¾ inch plywood. I took some measurements and roughed up a base of sorts. To this I added vertical rails, gluing and screwing them to the base. I used a cut-out tool with a router bit, smoothed and rounded off all the edges.

To this I added a total of three layers of epoxy resin and filled and radiused the facing sides.

When the last coat of filler was done and sanded, I used a can of Krylon flat green and painted the tray. Nice part about this was the green was a close match to the original plastics.

Next, I decided I needed a way to mount a couple of antennas to the rear rack. Having some experience with customizing an antenna bracket on one of my other SAR rigs, I figured I could come up with something that would fit the bill. I took a piece of 1 inch OD pipe and cut it lengthwise on a chop saw with a metal cutting disk. Then I took a piece of 1/8 inch thick angle iron and cut a piece about 3 and a half inches long. I arc welded the “half-pipes” to the top and bottom of the angle iron.


Next I cut a back plate and drilled three mounting holes on both pieces. So when everything was done, I would have a mount that uses the cargo rack to keep it secure and doesn’t allow it to twist or turn. Once this was finished I painted it with some black “Stove” paint. This stuff is tough to begin with, but I also used a trick I came up with on the last antenna mount. I uses a standard propane blow torch and heated the metal up for a couple of minutes. Then I hit it with the paint. It sticks well and cures fast and it seems to last.
I am pretty happy with results and have a few more mods to go. One of my old SAR rigs was a Ford Bronco II. It came to me with a brush guard and winch plate. Funny thing was, the winch was from Harbor Fright and designed for quads! When I sold it, the buyer wanted to dicker so I kept some gear, including the winch. I will need to spend some time coming up with a proper mount for it. I would have preferred to mount the winch on the back, but the exhaust is kinda in the way, so I may end up putting it on the front. I found some decent off-road LED lights on Amazon. These run $30.00 plus shipping. I hope to add these soon. Since this will be a work in progress, I hope to add pictures and content as I go. If you have done similar work or have ideas, I would love to hear them.
Dec 8, 2014 | 02:28 PM
#3
Thread Starter
|
Weekend Warrior
Joined: Nov 2014
Posts: 13
Likes: 0
From: Shelton, Washington
Suzuki LTF250 SAR Upgrades
Here uis a close up of the finished antenna mount. The open tube is for another piecee of tubing that holds a strobe light. Turned out ok for an hours work. Need to square up the back plate I think.


Here is a couple of pics with everything mounted up-
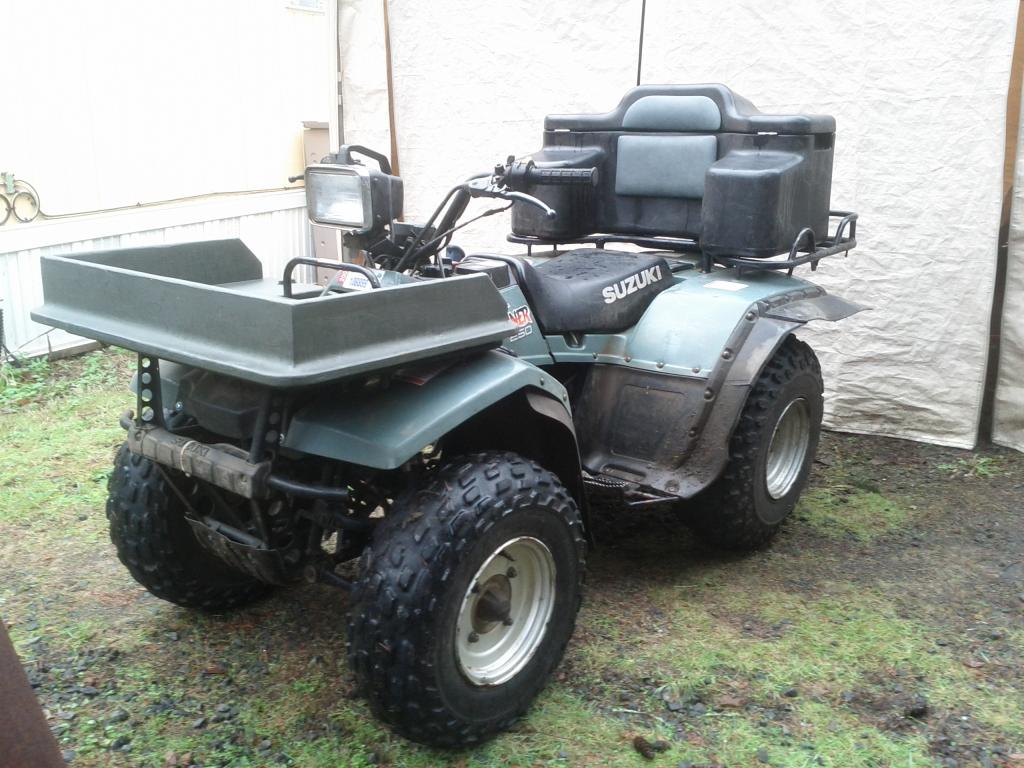
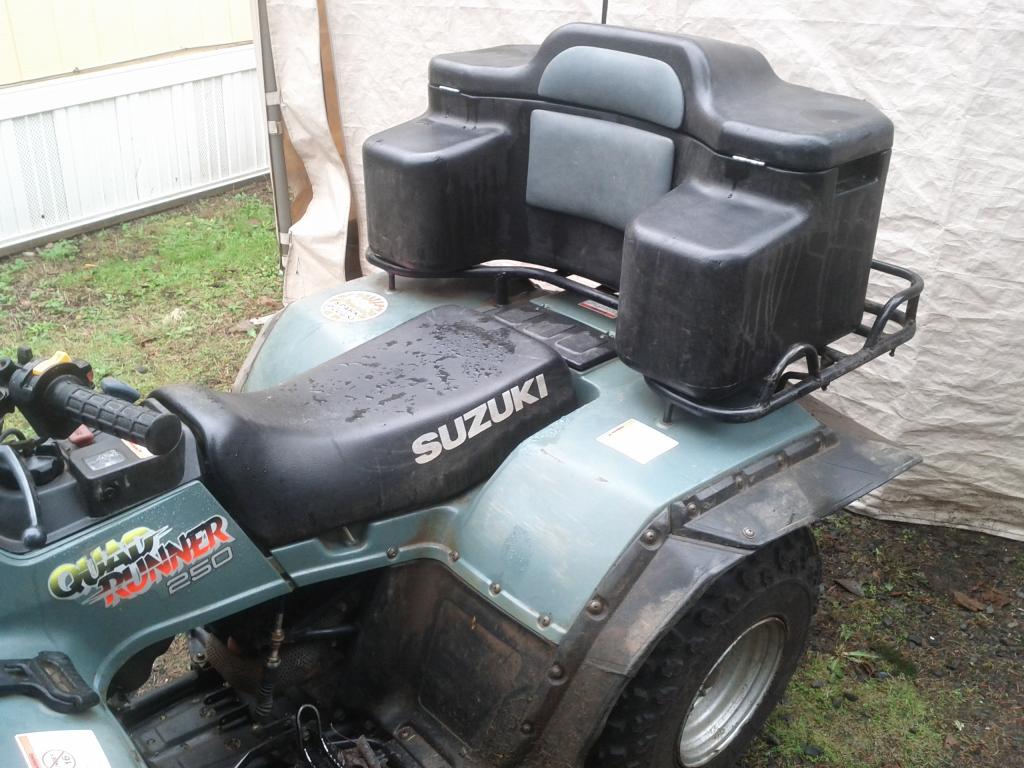


Here is a couple of pics with everything mounted up-


 Dec 8, 2014 | 02:56 PM
#4
Super Moderator
Well, golly JimBob!
Well, golly JimBob!

Joined: Aug 2006
Posts: 40,210
Likes: 55
One thing I would suggest is get a set of good mud tires for the back if you can find them in a size that would fit your quad. It would amaze you what a difference it would make in snow, sand, and mud.
Dec 8, 2014 | 04:32 PM
#5
Thread Starter
|
Weekend Warrior
Joined: Nov 2014
Posts: 13
Likes: 0
From: Shelton, Washington
Tires
Yeah, tires all around are definately on the wish/need list. Finanaces are always a consideration. Got any recomendations for a reasonably prices tire that might fit the bill? As this is my first quad, would I want to match the tread pattern on the front tires as well?
Dec 9, 2014 | 10:06 AM
#6
Super Moderator
Well, golly JimBob!
Well, golly JimBob!
Joined: Aug 2006
Posts: 40,210
Likes: 55
Thanks Moose-
Yeah, tires all around are definately on the wish/need list. Finanaces are always a consideration. Got any recomendations for a reasonably prices tire that might fit the bill? As this is my first quad, would I want to match the tread pattern on the front tires as well?
Yeah, tires all around are definately on the wish/need list. Finanaces are always a consideration. Got any recomendations for a reasonably prices tire that might fit the bill? As this is my first quad, would I want to match the tread pattern on the front tires as well?


Thread
Thread Starter
Forum
Replies
Last Post
Currently Active Users Viewing This Thread: 1 (0 members and 1 guests)