


need to rejet after new exhuast???
 Nov 16, 2007 | 12:28 AM
#41

Trailblazer
Joined: Oct 2007
Posts: 51
Likes: 0
 need to rejet after new exhuast???
hey nicaDd, that part number for the adjustable needle, if that is for a yfz450 07 wouldn't it be the same as stock non adjustable? I hope i ordered the right part it was a different number than the one you have listed. I ordered the needle for the yz450f 07, 08 dirt bike as klier suggested. just not sure if the year was right. the dealer didn't seem to know crap and the microfische looked like the needle should be adjustable. klier what year was you needle made to fit? nicaDd have you got yours yet and is it correct? Damn all this hassle for a needle that should have been put in stock in the first place. i guess i should have just got the jet kit to start with.
Nov 16, 2007 | 01:13 AM
#42

Thread Starter
|
Weekend Warrior
Joined: Nov 2007
Posts: 23
Likes: 0
need to rejet after new exhuast???
Giesdog, the part number on the jet chart is correct. the original stock needle is part number 5TG-14916-<u>GR</u>-00. The adjustable needle part number is 5TG-14916-<u>V1</u>-00.
find out which one you ordered.
Klier, looking at your pics of your airbox, did you install the billet ring on the INSIDE ??
find out which one you ordered.
Klier, looking at your pics of your airbox, did you install the billet ring on the INSIDE ??
Nov 16, 2007 | 10:24 AM
#43
Pro Rider
Joined: Jun 2002
Posts: 506
Likes: 0
From: Faribault, MN
need to rejet after new exhuast???
giesdog: I got the needle as part of the GYT-R jet kit. However, it's a big expense just to get a usable needle and pilot (and sticky adhesive tape that leaves sticky on both) :-O
nicaDd: The bigger rim goes on the inside where the K&N will slide on and clamp to. The smaller rim goes on the outside where the thin clamp goes (the one that connects to the snorkel).
nicaDd: The bigger rim goes on the inside where the K&N will slide on and clamp to. The smaller rim goes on the outside where the thin clamp goes (the one that connects to the snorkel).
Nov 16, 2007 | 02:40 PM
#44
Thread Starter
|
Weekend Warrior
Joined: Nov 2007
Posts: 23
Likes: 0
need to rejet after new exhuast???
Klier, I'm actually talkin about the whole billet piece. I screwed mine in from the ouside until I saw your pics. the rim where you insert the screws in is on the outside on mine.
I guess I'll take a pic of how I mounted it and compare. Yours is also the ModQuad version, right??
I guess I'll take a pic of how I mounted it and compare. Yours is also the ModQuad version, right??
Nov 16, 2007 | 07:29 PM
#45
Thread Starter
|
Weekend Warrior
Joined: Nov 2007
Posts: 23
Likes: 0
need to rejet after new exhuast???
here are some pics I took of my airbox with new Modquad kit installed... So did i install the Billet ring on the wrong side?


Here's a comparison of the old and the new.


Another question. did you guys use the existing clamp that holds together the end of the header to the beginning of the exhaust pipe?? mine is now too big to hold the 2 pieces together.
new pipe on the left and header on the right. It's flares just enough to slip right over the header.

see the gap on the bottom of the clamp??
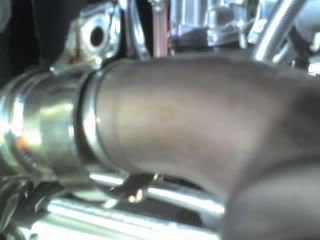
Here's a comparison of the old and the new.
Another question. did you guys use the existing clamp that holds together the end of the header to the beginning of the exhaust pipe?? mine is now too big to hold the 2 pieces together.
new pipe on the left and header on the right. It's flares just enough to slip right over the header.
see the gap on the bottom of the clamp??
Nov 16, 2007 | 08:10 PM
#46
Pro Rider
Joined: Jun 2002
Posts: 506
Likes: 0
From: Faribault, MN
need to rejet after new exhuast???
Looking back on the directions for the Modquad kit, the only thing I saw was on STEP 2, Says to Install the O-Ring in your air-flow adaptor (already done when i bought mine), and install _in_ air box. Install bolts and washers from front of air box and tighten securely and install lock nuts.
I went again and put a little loctite on the bolts before I installed them "just in case", as I've learned bolts love to vibrate loose when you don't want them to.
I guess what I figured from looking at my airbox, the K&N filter, and the snorkel, that the bigger mating surface should go on the inside of the airbox where the filter goes, and the smaller mating surface goes on the outside of the airbox where the skinny clamp goes that connects to the plastic snorkel leading to the carb.
The HMF kit I got came with replacement clamps for the exhaust. You may want to check with Dr. D to see what the game plan is on that. I wouldn't think there would be that much of a difference... it's not like the diameter of the pipe changed at all.
Oh, and one more thing, use some loctite on the exhaust mounting bolts on the back, and keep them tight after every ride. Mine still seem to loosen up a little bit after a whole day's ride.
I went again and put a little loctite on the bolts before I installed them "just in case", as I've learned bolts love to vibrate loose when you don't want them to.
I guess what I figured from looking at my airbox, the K&N filter, and the snorkel, that the bigger mating surface should go on the inside of the airbox where the filter goes, and the smaller mating surface goes on the outside of the airbox where the skinny clamp goes that connects to the plastic snorkel leading to the carb.
The HMF kit I got came with replacement clamps for the exhaust. You may want to check with Dr. D to see what the game plan is on that. I wouldn't think there would be that much of a difference... it's not like the diameter of the pipe changed at all.
Oh, and one more thing, use some loctite on the exhaust mounting bolts on the back, and keep them tight after every ride. Mine still seem to loosen up a little bit after a whole day's ride.
Nov 16, 2007 | 08:52 PM
#47
Thread Starter
|
Weekend Warrior
Joined: Nov 2007
Posts: 23
Likes: 0
need to rejet after new exhuast???
ok so I stared at the thing for a while...haha tried to install the air box and of coarse the part that clamps to the snorkel is small than the snorkle so it wouldn't tighten up. So I ended up putting the billet ring on the inside like you have yours and it worked perfectly!!!
I actually called dubach racing earlier and asked about the clamp and they said I didn't nee it. i guess that's why they call it a slip on...lol
good suggestion on the loctite. I'm going out tomorrow to give it a run so I should put some loctite on right now to let it set and cure.
my backyard is big enough to do a few short ovals and man does the bike wanna kick me off now..haha It's like trying to walk a big *** dog big the leash and then suddenly the dog takes off yanking you behind it...
It idles alot better too. The only thing that concerns me is a little white smoke comming from the exhaust after that short test run. could be just burning in bcuz it's new? Or is it running a little too lean/rich?? I put 1 1/2 turns on the fuel mixture.
here's some pics with the pipe on.
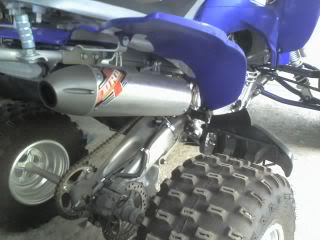
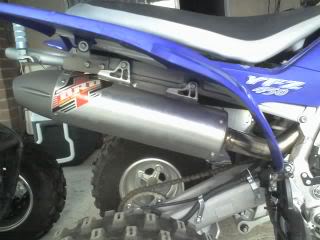
I actually called dubach racing earlier and asked about the clamp and they said I didn't nee it. i guess that's why they call it a slip on...lol
good suggestion on the loctite. I'm going out tomorrow to give it a run so I should put some loctite on right now to let it set and cure.
my backyard is big enough to do a few short ovals and man does the bike wanna kick me off now..haha It's like trying to walk a big *** dog big the leash and then suddenly the dog takes off yanking you behind it...
It idles alot better too. The only thing that concerns me is a little white smoke comming from the exhaust after that short test run. could be just burning in bcuz it's new? Or is it running a little too lean/rich?? I put 1 1/2 turns on the fuel mixture.
here's some pics with the pipe on.
Nov 16, 2007 | 09:01 PM
#48
Pro Rider
Joined: Jun 2002
Posts: 506
Likes: 0
From: Faribault, MN
need to rejet after new exhuast???
Haha, yeah man, I wasn't kidding when I said it'd be a new quad. The stock muffler is very restrictive, especially with the "pea shooter" installed.
White smoke usually indicates a coolant leak in the engine, but I would place a bet that it might just be the packing getting hot for the first time. My HMF smelled for a little while after the initial startup. Keep an eye on it for a while. A motor running lean wouldn't really offer any visible exhaust difference I don't think. I know if you're running rich it may appear a little "sooty". To be absolute sure, go give the quad hell for a little bit, then shut her down, pull the headlights, front fenders, and gas tank off, and pull the plug out and see what it looks like. Should be a nice tan color. White = Lean, Black = Rich.
Your quad now has the ***** to hit 55-60 foot jumps pinning it 20 feet before the jump. Hahah. Have fun!
White smoke usually indicates a coolant leak in the engine, but I would place a bet that it might just be the packing getting hot for the first time. My HMF smelled for a little while after the initial startup. Keep an eye on it for a while. A motor running lean wouldn't really offer any visible exhaust difference I don't think. I know if you're running rich it may appear a little "sooty". To be absolute sure, go give the quad hell for a little bit, then shut her down, pull the headlights, front fenders, and gas tank off, and pull the plug out and see what it looks like. Should be a nice tan color. White = Lean, Black = Rich.
Your quad now has the ***** to hit 55-60 foot jumps pinning it 20 feet before the jump. Hahah. Have fun!
Nov 17, 2007 | 03:01 PM
#49
Trailblazer
Joined: Oct 2007
Posts: 51
Likes: 0
need to rejet after new exhuast???
nicaDd, I am asuming the part number you have listed is not for the yz450 dirt bike. Is it then for a replacement for the gytr jet kit? the yami websit doesn't show aftermarket part numbers in the microfische, so i am unable to find that part number. i would give it to the dealer but i already ordered the needle for the 07 yz450f, hoping that it was adjustable. oh well just have to wait and see what i get i guess.
Nov 17, 2007 | 10:58 PM
#50
Thread Starter
|
Weekend Warrior
Joined: Nov 2007
Posts: 23
Likes: 0
need to rejet after new exhuast???
yeah I think that part number with the V1 in it is off the GYTR kit. when I showed the guy at the shop he was able to pull it up on his computer and order it.
Well I just got back from some trail ridin for the day and let me tell ya, it felt like I had a totally new bike. before the mods it felt like it was just screaming for more air and running real "tight". but now it's real smooth and very responsive. I was going up some hills on 3rd gear from almost a dead stop. Couldn't even do that on 2nd when it was stock. you can laso hear that characteristic "hiss" with that K&N filter installed. almost like when you install one on a truck.
Well I just got back from some trail ridin for the day and let me tell ya, it felt like I had a totally new bike. before the mods it felt like it was just screaming for more air and running real "tight". but now it's real smooth and very responsive. I was going up some hills on 3rd gear from almost a dead stop. Couldn't even do that on 2nd when it was stock. you can laso hear that characteristic "hiss" with that K&N filter installed. almost like when you install one on a truck.