
800 sprotsman front end dive and sag
 Apr 17, 2012 | 06:37 PM
#11
Trailblazer
Joined: Apr 2009
Posts: 74
Likes: 0
From: Saskatchewan, Canada
I looked at some of the pictures that are posted here so I think I have a good idea of what to do. Pulling the wheels and the nut on the axel is what the dealer told me to do so that is the way I will tackle the job. Heading out to do that now so hopefully it will not take that long. I have my camera and will take a few shots.
Apr 17, 2012 | 08:01 PM
#12
Trailblazer
Joined: Jun 2011
Posts: 82
Likes: 0
I looked at some of the pictures that are posted here so I think I have a good idea of what to do. Pulling the wheels and the nut on the axel is what the dealer told me to do so that is the way I will tackle the job. Heading out to do that now so hopefully it will not take that long. I have my camera and will take a few shots.
Please do, as my High Lifter HD springs will be here in a few days and I will be tackling the same job. Thanks a bunch!
Apr 17, 2012 | 09:22 PM
#13
Trailblazer
Joined: Apr 2009
Posts: 74
Likes: 0
From: Saskatchewan, Canada
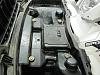
Just completed the job, took about an hour and fifteen minutes. Took a bit of time to figure out how many bolts and screws held the front rack on. I took pictures to show where they are located. 4 bolts in the case itself and then 4 screws underneath (2 on each fender) and 4 more (2 on each side at the back) hold the rack on.
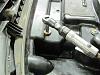
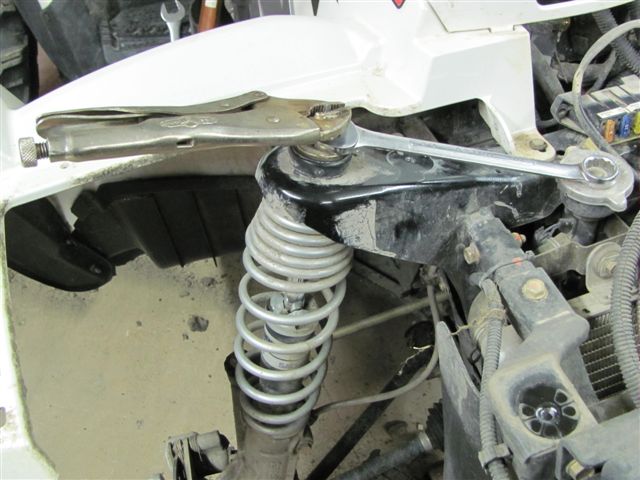
I then pulled the front wheel and jacked the bike up in the center and placed a jack stand. I then moved my hydraulic floor jack under the outer arm so that I could control the height as I unhooked the strut. I then undid the axel bolt after taking off the wheel and hit the end of the shaft with a rubber hammer so that is was loose and would move towards the center of the bike.
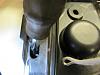
I then undid the top nut and held the shaft with a vice grip while getting the nut loose. At this point I released the jack slowly and the strut dropped out but I was sure to only let it release enough to clear the top strut mount. While I was dropping the jack I pushed the axel into the hub (it will only go an inch or two) to keep everything from unhooking. With the top of the strut clear the top nut can be accessed and removed. The spring comes off at that time and with it the rubber jounce. Bang the spring to release the jounce and then grab the new spring, install the jounce on the strut shaft and then the new spring with the small end up. The cover and nut go on, followed by the rubber stopper over the nut. You then shove the strut under the bracket that holds it, install the top washer and nut (hold the shaft again) and tighten the nut until it bottoms.
You can then install the nut on the axel and replace the cotter key, wheel and you are done that side. Repeat on the other side, reinstall the rack and all the junk you carry and you are good to go.
I think I spent more time unloading and loading plus taking pictures than I did doing actual work but then again I have reasonable tools and used an air wrench for the wheel studs and the struts.
I will try and post the pics but no idea how mauch space there is. I took 12 pics and they are 640x480.
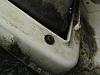
One thing to note is that I measured the top of my front bumber from the ground before I started and it was 32 3/4 inches to the top of the bar. After the install of the new Polaris HD springs the front is now 37 1/2 inches high so a gain of almost 5 full inches. It still collapses like before when you push on it but has greater clearance. You can compare the last picture in the sequence to the picture in my signature to see before and after. The wheels now stand straight as well.
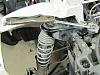
I then pulled the front wheel and jacked the bike up in the center and placed a jack stand. I then moved my hydraulic floor jack under the outer arm so that I could control the height as I unhooked the strut. I then undid the axel bolt after taking off the wheel and hit the end of the shaft with a rubber hammer so that is was loose and would move towards the center of the bike.
I then undid the top nut and held the shaft with a vice grip while getting the nut loose. At this point I released the jack slowly and the strut dropped out but I was sure to only let it release enough to clear the top strut mount. While I was dropping the jack I pushed the axel into the hub (it will only go an inch or two) to keep everything from unhooking. With the top of the strut clear the top nut can be accessed and removed. The spring comes off at that time and with it the rubber jounce. Bang the spring to release the jounce and then grab the new spring, install the jounce on the strut shaft and then the new spring with the small end up. The cover and nut go on, followed by the rubber stopper over the nut. You then shove the strut under the bracket that holds it, install the top washer and nut (hold the shaft again) and tighten the nut until it bottoms.
You can then install the nut on the axel and replace the cotter key, wheel and you are done that side. Repeat on the other side, reinstall the rack and all the junk you carry and you are good to go.
I think I spent more time unloading and loading plus taking pictures than I did doing actual work but then again I have reasonable tools and used an air wrench for the wheel studs and the struts.
I will try and post the pics but no idea how mauch space there is. I took 12 pics and they are 640x480.
One thing to note is that I measured the top of my front bumber from the ground before I started and it was 32 3/4 inches to the top of the bar. After the install of the new Polaris HD springs the front is now 37 1/2 inches high so a gain of almost 5 full inches. It still collapses like before when you push on it but has greater clearance. You can compare the last picture in the sequence to the picture in my signature to see before and after. The wheels now stand straight as well.


Thread
Thread Starter
Forum
Replies
Last Post
Currently Active Users Viewing This Thread: 1 (0 members and 1 guests)