
85 to 88 Suzuki LT230S Quadsport help.
#4171
 09-12-2008, 05:24 PM


Ok Randy, I made a custom valve spring compressor and removed the valves, i got a few questions. Are the cotters supposed to split upon removal? How do I remove the seats and seals? How do i know if i need new valves? And how can i remove the carbon buildup on the exhaust valve and exhaust exit to the muffler?
#4172
09-12-2008, 05:59 PM
Yeah, those retainer thingys are supposed to be split like that. You don't remove the valve seat.... Unless you have access to some fancy shop in Cali or Detroit, lol. No shop anywhere near me will touch a seat or valve guide. Basically, if you screw up a seat or guide, you'll need a new head.
If your valve looks anything like this, you need a new one.
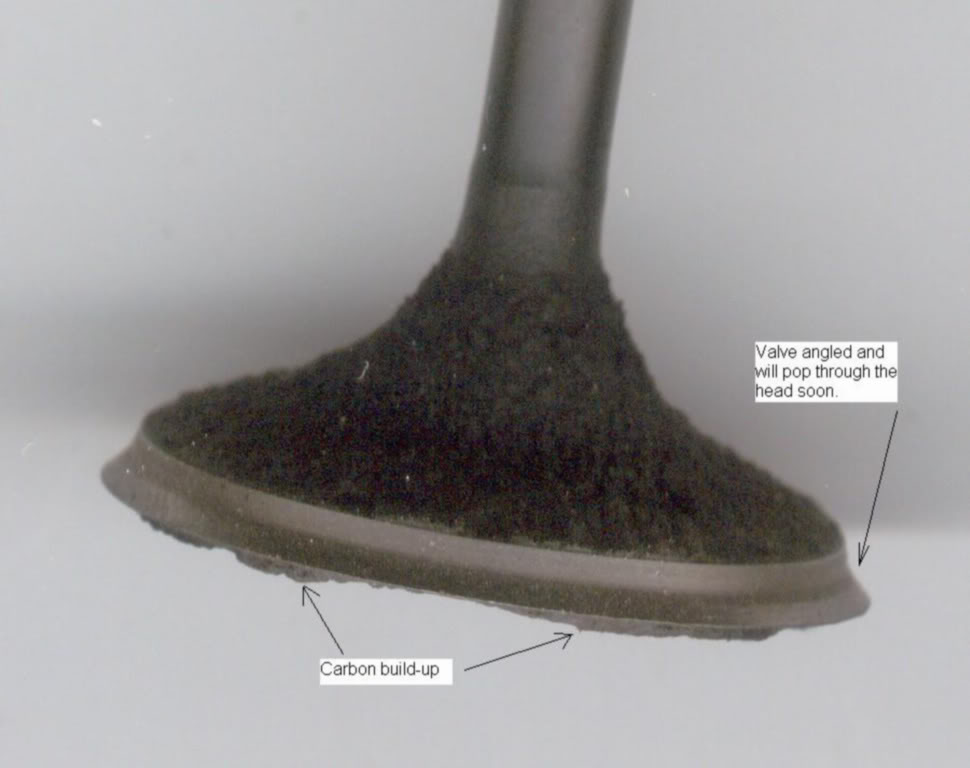
Unless your valve looks new, you should probably get a new one anyway.
The exhaust is probably ok. You should be able to reuse that one. Just lap the burn marks off and no more. Don't lap the hardness off the metal.
I use a $40 bench grinder from sears with a wire wheel to get the carbon off the valve. I use a dremel with an abrassive buff to get the carbon out of the port. Both tools are worthy investments and can be used on lots of projects... not just engines.
You can use needle nose pliers to pull the valve seals off. They will be junk once you remove them, so make sure you got new ones coming. Some kits seem to leave those out, so be careful.
If you get a dremel type tool, you can do some porting to your head too. You might want to grab a pack of jb weld if you decide to port.
Let me know what else comes up... I'll probably be out until way later tonight, but I'll check in before I crash.
If your valve looks anything like this, you need a new one.
Unless your valve looks new, you should probably get a new one anyway.
The exhaust is probably ok. You should be able to reuse that one. Just lap the burn marks off and no more. Don't lap the hardness off the metal.
I use a $40 bench grinder from sears with a wire wheel to get the carbon off the valve. I use a dremel with an abrassive buff to get the carbon out of the port. Both tools are worthy investments and can be used on lots of projects... not just engines.
You can use needle nose pliers to pull the valve seals off. They will be junk once you remove them, so make sure you got new ones coming. Some kits seem to leave those out, so be careful.
If you get a dremel type tool, you can do some porting to your head too. You might want to grab a pack of jb weld if you decide to port.
Let me know what else comes up... I'll probably be out until way later tonight, but I'll check in before I crash.
#4173
09-12-2008, 06:08 PM
Thanks, but both valves are angled so i guess ill jus replace them, but I have a dremel and bench grinder, so ill work on the heads, i also have jb weld, but should it be used if i mess up on the porting job? And also do i buy new cotters or jus use the split ones again? Thanks btw
#4174
09-12-2008, 06:39 PM
You mean #28 in this pic. http://www.alpha-sports.com/satv/1986/LT230S/04.htm Reuse them.
Read the stuff about porting here: http://mototuneusa.com/thanx.htm
Read the stuff about porting here: http://mototuneusa.com/thanx.htm
#4176
09-15-2008, 08:54 PM
Ok well I just started the porting job, and made a rough surface and is epoxy ready. But I have 2 questions, should I be doing the same thing to the exhaust? And as far as cleaning to get rid of the grease and evrything when its ready for installation, what should I use?
#4177
09-15-2008, 11:43 PM
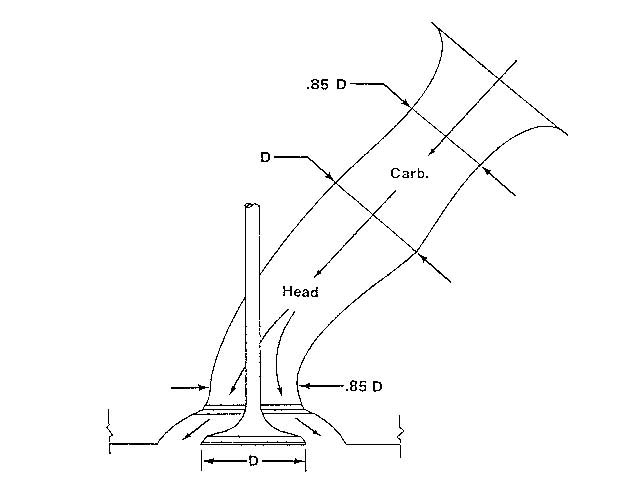
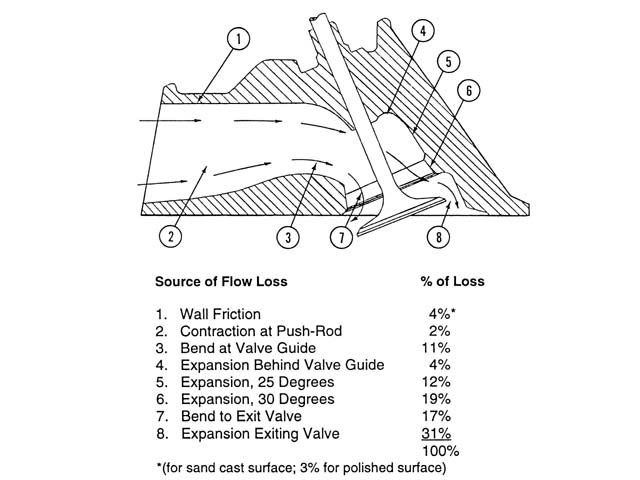
Can't use epoxy on the exhaust, but you can raise the roof of the port to create that funnel look and end up with a 28mm (exhaust valve diameter) port entrance. Just don't grind on the throat.... Leave that as the "nozzle" and then radius it around to the valve so the turn is the same diameter from the throat to the valve.
Raising the roof also makes the port more "downdraft". If you put a leaf blower on the port, you'll see what I mean.... The air really hugs the roof of the port.
On the intake, you can add to the bottom with JB and raise the top by grinding. But the exhaust you can only go so far before you'll have a vacuum under the high-flow stream of air
I'll have some pics up soon to show how I did it. There's a lot of reading online too. http://www.google.com/search?hl=en&q=head+porting
http://en.wikipedia.org/wiki/Porting_(engine)
I always use brake cleaner to disolve anything oil-base and it dries completely. Then use water.... For some reason water cleans metal off metal better than brake cleaner. For cleaning up after valve grinding always use water and compressed air. Then wipe with a wet towel until the towel comes up clean. Get the brake cleaner from the dollar store or walmart.
#4178
09-16-2008, 12:33 AM
#4179
09-16-2008, 05:18 PM
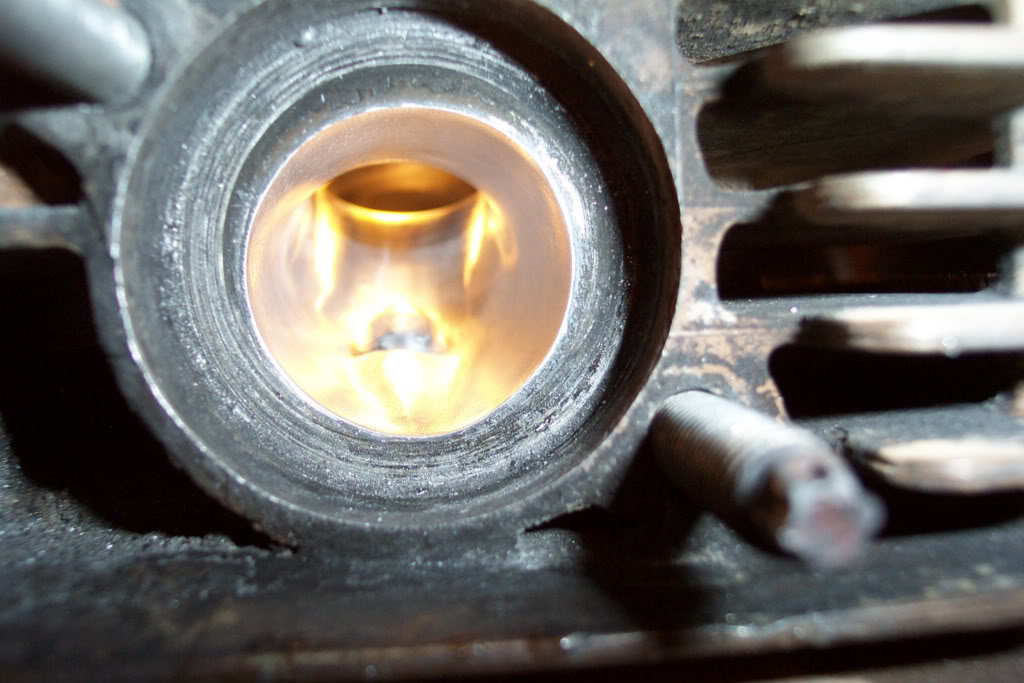
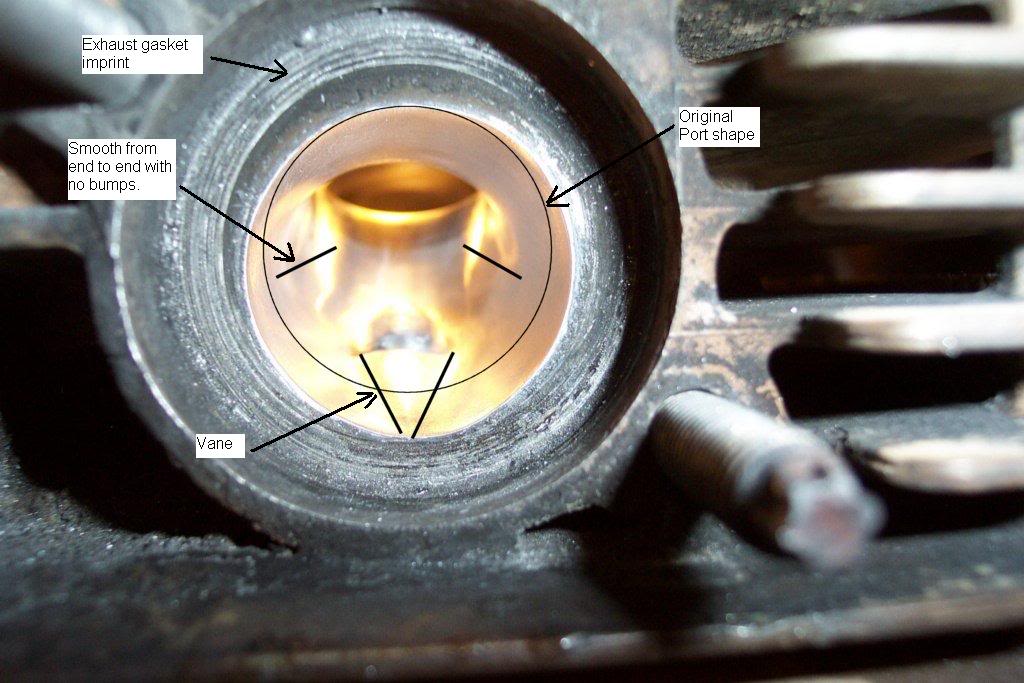
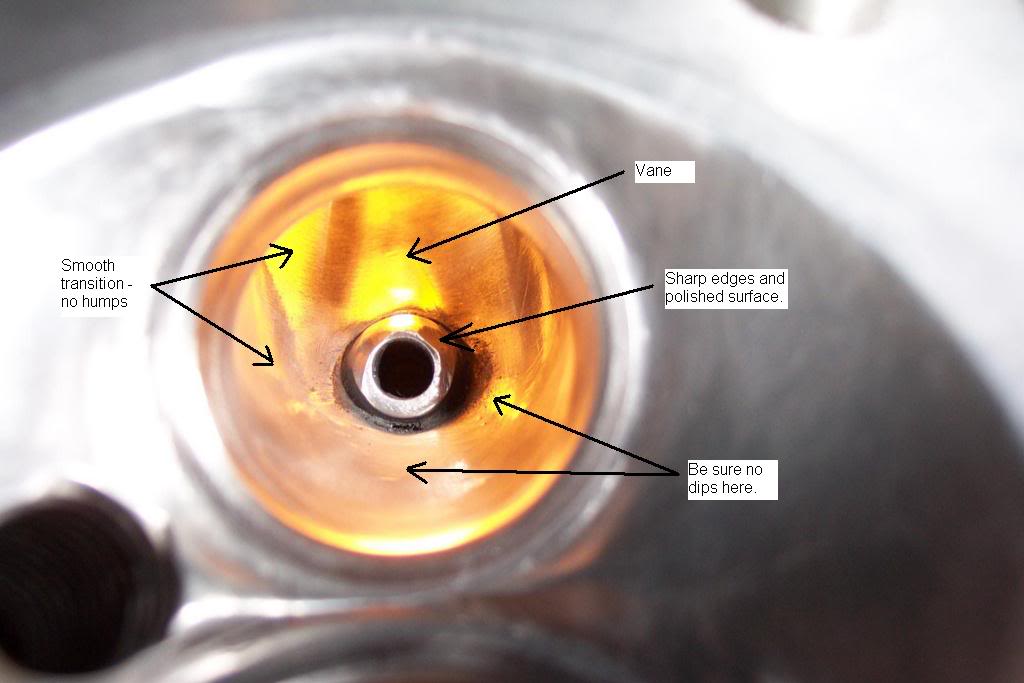
My pics turned out a little crappier than I thought, but... Anyway, you should be able to see where I raised the roof (bottom of the pic) and didn't touch the floor by looking at the exhaust gasket imprint. I also made it so that the exhaust valve will fit all the way inside to the valve guide. I posted the other pic to show I left a vane behind the valve guide to keep the air from forming drag as it passes around the guide.
I don't know if making the exhaust port the same size as the exhaust valve (28mm) is a good idea or not, but it made sense to me considering the exhaust header is 32mm and it makes it a bit more funnel shaped like motoman wants. I was affraid to grind the guide down smooth with the roof.... The guides wear fast enough and I'd rather have a straight-seating valve than a wee bit more air flow!
You should do a lot of studying before making a move... Any cutting on the exhaust side can't be undone (except by welding) and who wants to undo anything after its all put back together anyway even if it was relatively easy??? Better to be sure you know what you're doing the first time.
These are the things I'm 99% sure works: Smooth exhaust port surface, vane behind guide, and constant radius from valve seat to port throat. I don't know if the funnel thing really works or not, it just didn't seem right to have a 28mm valve and a 32mm header with a 24-26mm port.
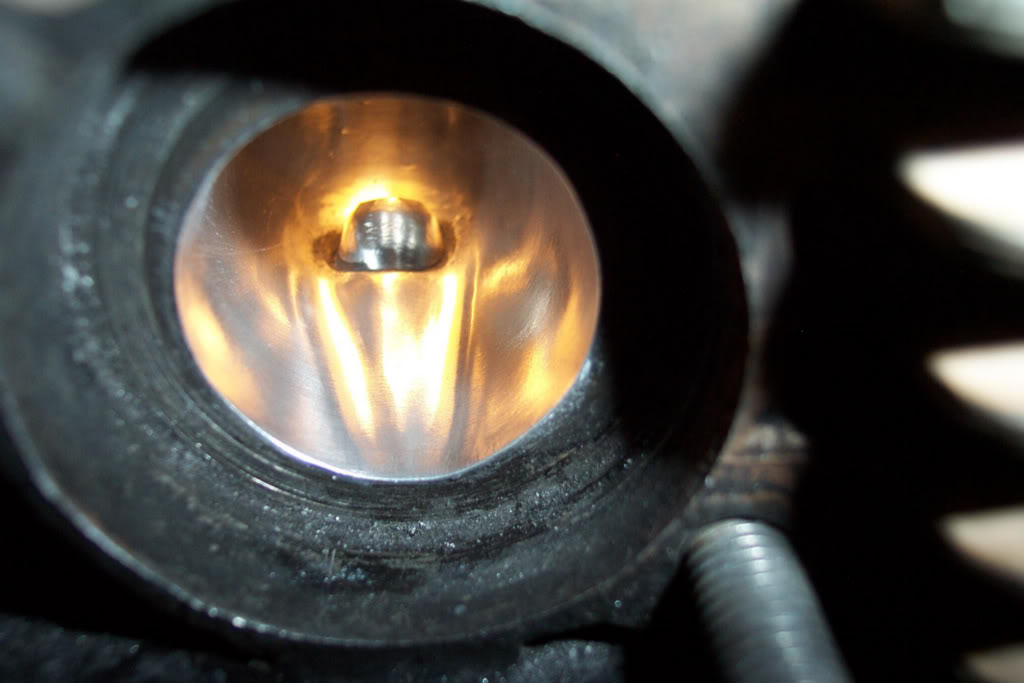
This pic shows what a straight shot I have to the combustion chamber since I raised the roof:

Illustrated pics:
I don't know if making the exhaust port the same size as the exhaust valve (28mm) is a good idea or not, but it made sense to me considering the exhaust header is 32mm and it makes it a bit more funnel shaped like motoman wants. I was affraid to grind the guide down smooth with the roof.... The guides wear fast enough and I'd rather have a straight-seating valve than a wee bit more air flow!
You should do a lot of studying before making a move... Any cutting on the exhaust side can't be undone (except by welding) and who wants to undo anything after its all put back together anyway even if it was relatively easy??? Better to be sure you know what you're doing the first time.
These are the things I'm 99% sure works: Smooth exhaust port surface, vane behind guide, and constant radius from valve seat to port throat. I don't know if the funnel thing really works or not, it just didn't seem right to have a 28mm valve and a 32mm header with a 24-26mm port.
This pic shows what a straight shot I have to the combustion chamber since I raised the roof:
Illustrated pics:
#4180
09-16-2008, 05:53 PM